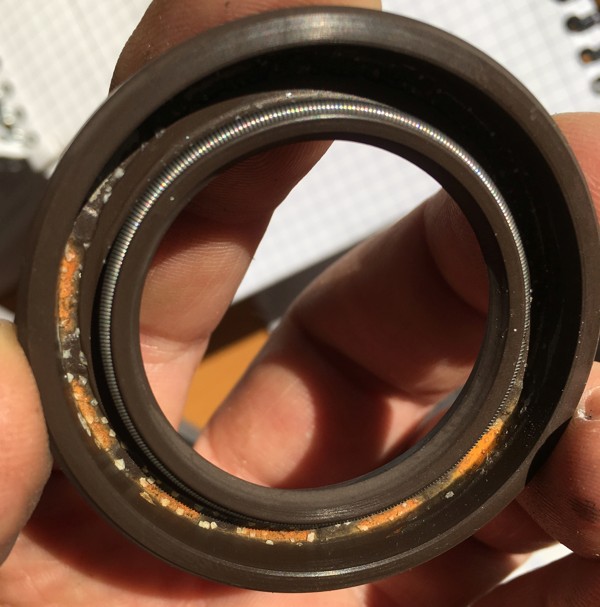
Repair report: Saildrive SD40/ SD50 clutch upgrade kit
The clutch upgrade kit, along with lapping and calibrating the clutch, is the be-all and end-all for a long service interval.
Note: if the SD50 is mentioned here, this also applies to the SD40.
There is a video available on my YouTube channel. The Video is in german languarge, but you can activate subtitle in english.
Upgrade in December 2023
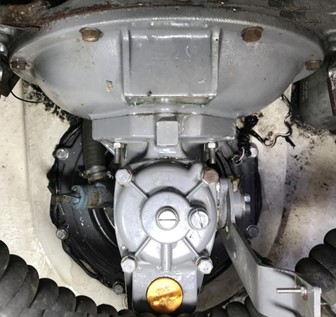
If the engine is running in the first or second position of the shift lever at the helm station, but hardly any water is being moved, a slipping clutch is often the cause. If this suddenly happens during port maneuvers, quick, prudent decisions are necessary. Most of the time, the clutch grips after all, and the situation is saved. But then the cone clutch of the SD 50 needs to be serviced. You study the manual and service manual of the SD50 and read that the clutch should be lapped every 500 hours and that a new clutch is due every 2000 hours. If you contact the Yanmar Service, you get offers of 800€ - 3500€ for the "lapping" and possibly exchange the cone, often with the instruction "ship out of the water". The internet is full of bad experiences with slipping Yanmar cone clutches and garages that are as incompetent as they are greedy. Really positive experiences can only be read occasionally. Most information describes "lapping" but not calibrating the cone clutch. This is essential for a long durability of the repair.
In 2017 I already developed a repair kit. However, this still required Yanmar parts, which were partly responsible for the rapidly increasing clutch play and thus partly responsible for the slipping of the sail drive clutch.In 2022 I had a new nut and support bearing made by a CNC workshop that no longer had these disadvantages. For the repair according to this guide you don't need to take the ship out of the water, just some time and the upgrade kit.
These repair instructions describe the "lapping" as well as the calibration and installation of the upgrade kit.
If the entire clutch has to be replaced due to a defect, other measurements are necessary. I would be happy to explain this rather unusual work to me directly by email, as it would go beyond the scope of this paper.
The problem with this clutch is:
1. The Yanmar Collar Set, which are copper support washers, are only available in 0.5mm increments. This means that the clutch play can only be adjusted in 0.5mm increments. The result is a clutch play between 0.05mm and 0.5mm.
2. On the underside of the coupling, the support bearing (also with copper washers) is held in place by circlips. Due to the high adhesive strength of the lower support bearing on the copper wear disc and on the bearing seat, the circlips rotate in the axle and wear out very quickly. This contributes to the increasing play in the clutch.
3. The coupling is held in place by a lock nut, the lock ring of which must be chiseled or cut when dismantling. Splinters and chips can penetrate the bearings. Add to that the beatings on the camp, I don't like that at all. And that according to the service manual every 500 hours, which is not sustainable and puts an unnecessary strain on the wallet.
4. In the Saildrive, the clutch axle hangs on the copper disc with a weight of approx. 600g. When sailing with a fixed-pitch propeller, the axle rotates and wears out the copper washer under the nut. This contributes to increasing clutch play.
5. The shifter, which moves the bronze cone between forward and reverse gear, must also be calibrated with fitting rings.
If all repair steps have been carried out correctly, downtimes until the next maintenance/repair of 1000 hours and more are possible, if not, the clutch is more likely to slip again.
Required tools and spare parts:
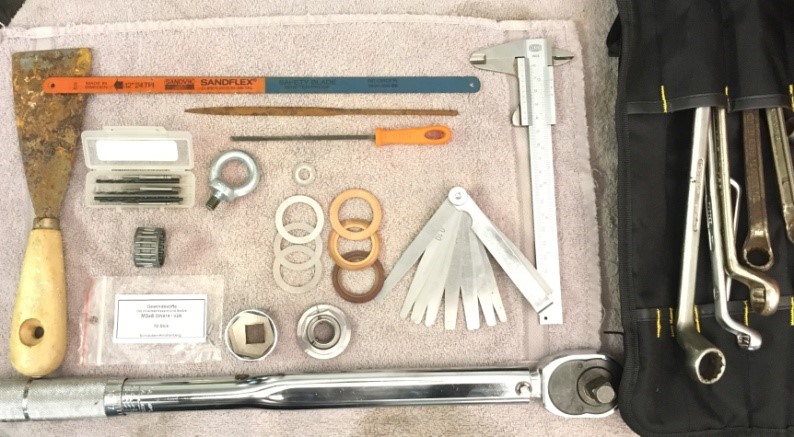
feeler gauge; Paint brush; cleaning spirit; Set ring / open-end wrench; M8 eyebolt; callipers; triangular key file, small, narrow saw blade; old spatula with a continuous metal core and wooden handle; flat screwdriver small-medium-large; plastic mallet; metal hammer; massive vise; aluminum jaws; small chisel; stable impact screwdriver (with continuous metal core); torque wrench (150Nm); 27 socket, oil suction pump; Loctite superfest or other manufacturers with these properties (called screw tightener in the report); 2mm allen key;
Clutch upgrade kit:
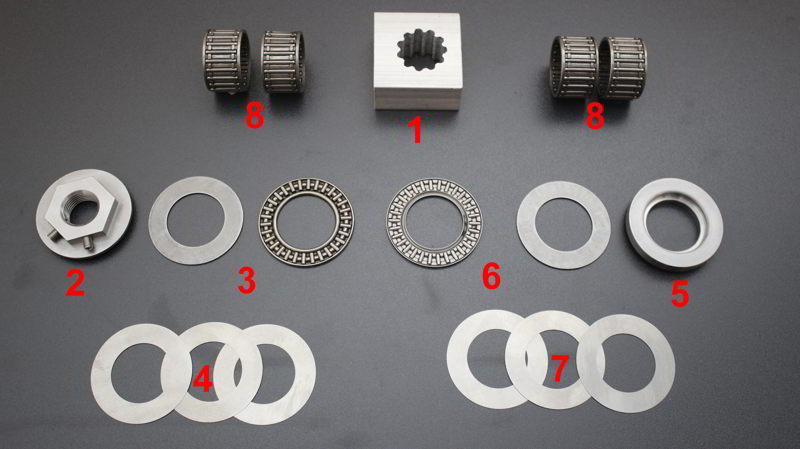
The M16 nut, the spline tool are made in a CNC workshop. These parts and also the 0.1mm/0.2mm/0.5mm shims can be used over and over again. The following applies to the cage and axial bearings: If the small bearing rollers fall out of the bearing cage, the bearings must be replaced.
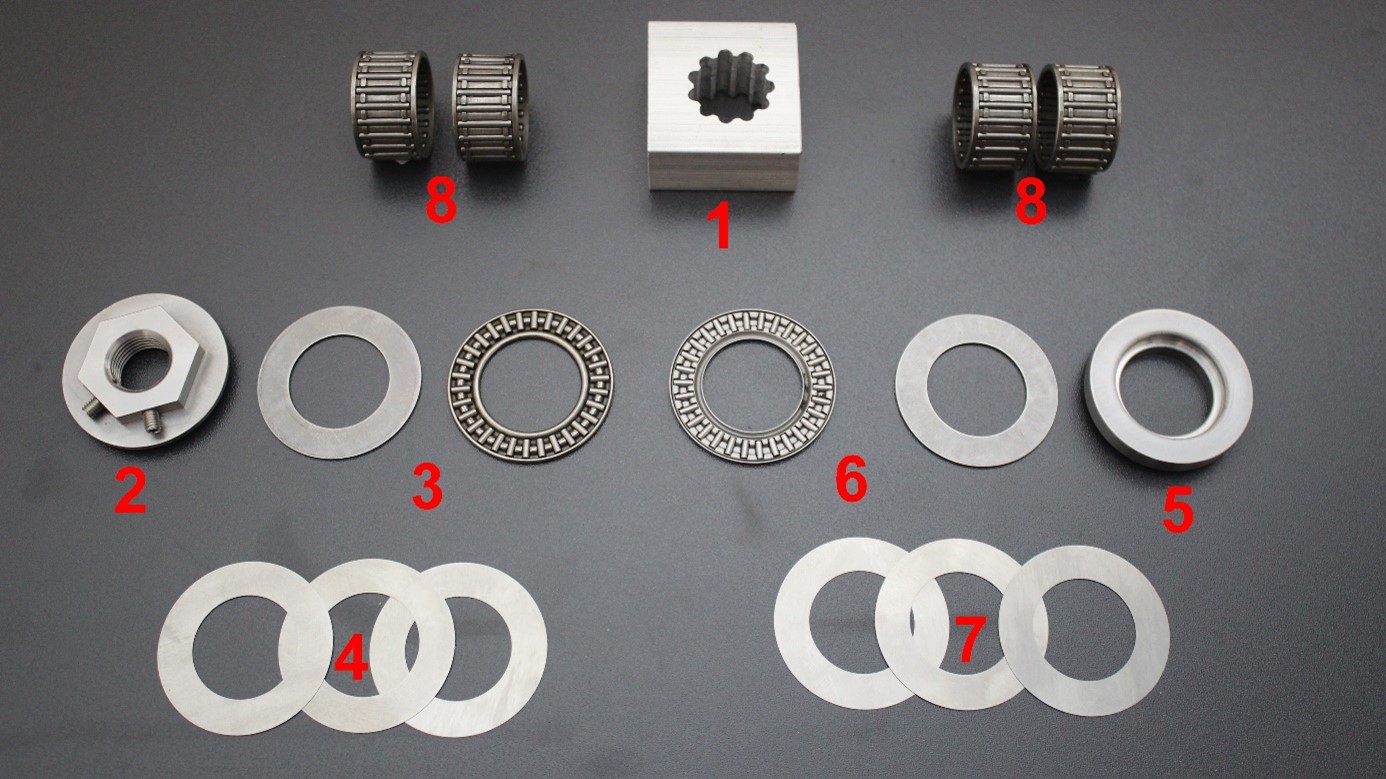
1: Spline Tool (tool steel, zinc-plated, reusable)
2: Nut M16x1.5 left (tool steel, reusable)
3: Thrust bearing with bearing washer
4; 7: 0.1mm-0.2mm-0.5mm shims (spring steel, reusable)
5: Support bearing (tool steel, reusable)
6: Thrust bearing with bearing washer(reusable)
8: cage bearings 4 pieces (reusable)
Rework the saildrive cover for the use of the clutch upgrade (on request)
There is now also a bag with 50 grams abrasives and a bag of spare o-rings. Both are part of the service kit.
Simply load the order list, tick the parts you want and send me the file. (Info: The file can be edited directly in Acrobat Reader and also calculates.)
Or write me an email
Remove clutch:
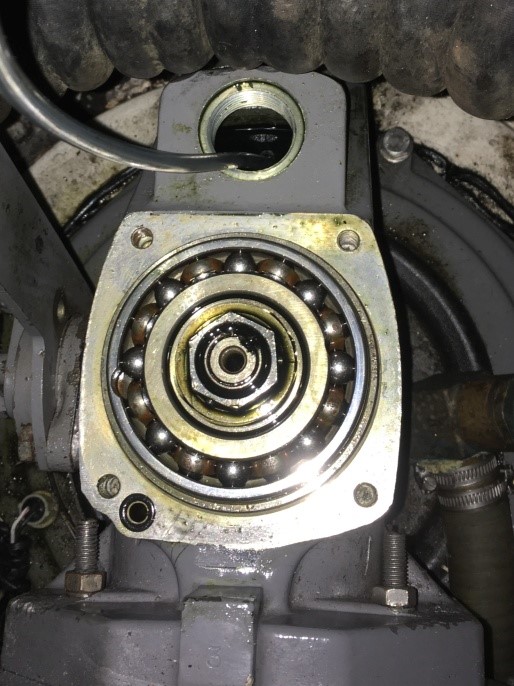
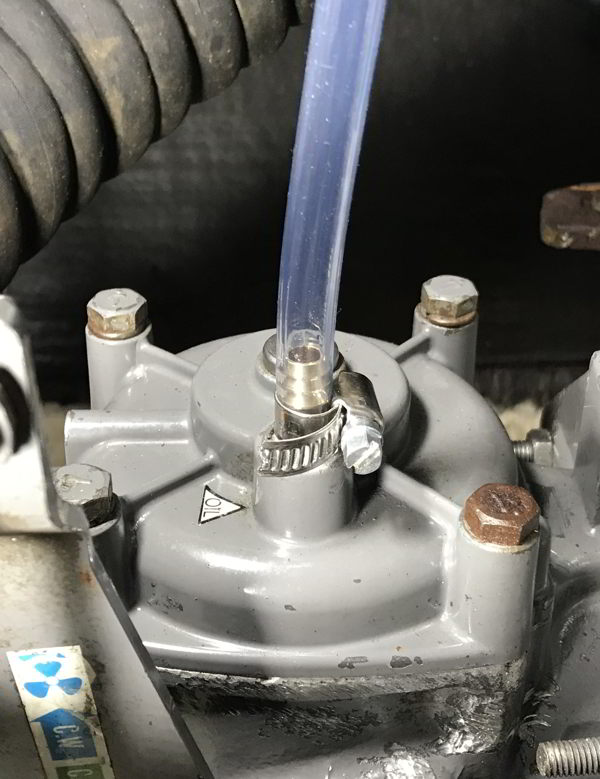
Either you do an oil change, then you suck the oil out of the saildrive as described in the manual.
Otherwise it is sufficient to suck out the oil from the area below the oil dipstick.
Unscrew the 4 screws from the top cover. Pay attention to the O-rings (part no.: 024311-000090), (part no.: 24321-000950) and the fitting ring T5 (part no.: 196322-02320), they will continue to be used.
There are fitting rings above (T5) and below the coupling (T1) so that the coupling is at the correct height and sits firmly in the housing. Both will continue to be used.
(See picture clutch below headline : Assemble the clutch)
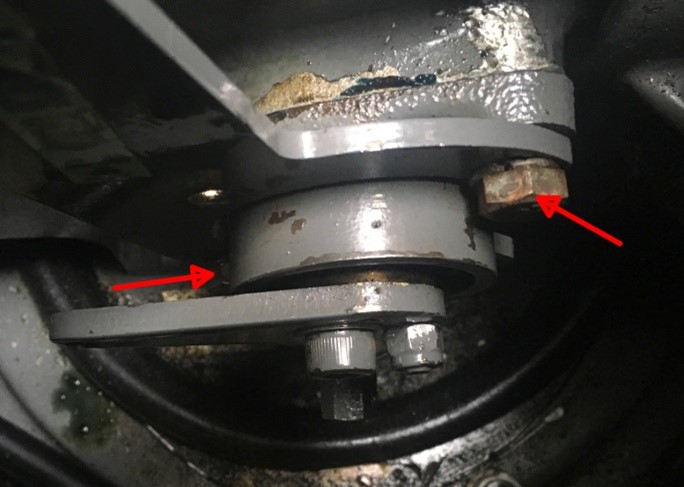
First remove the shift cable from the clutch lever.
Then use a permanent marker to mark the position of the forward/reverse/neutral shift lever on the sail drive housing.
Loosen the two screws (red arrow) and remove the shift lever.
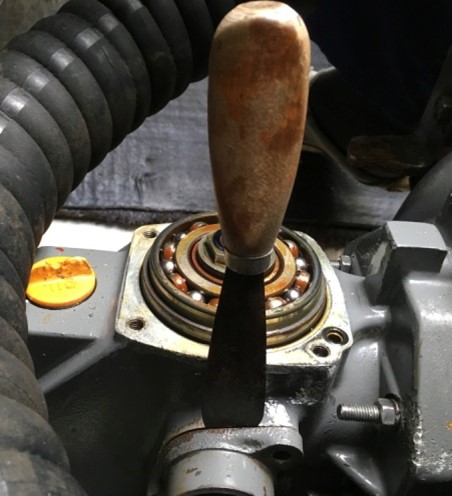
Then drive the spatula between the flange and the clutch housing and further enlarge the gap with the small screwdriver. Pull the clutch lever with flange out of the clutch housing with small back and forth movements by hand.
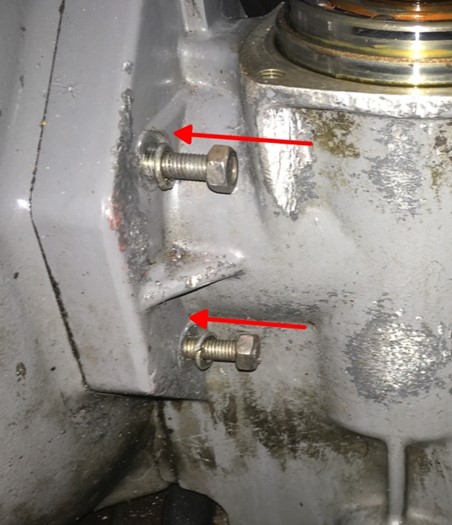
Then loosen the 4 nuts on either side of the SD50 flange and turn back as shown. Important!! Leave the nuts on the studs.
Then drive back the screws (crosswise) and nut in the direction of the engine with a mounting iron or a plastic hammer.
This really works (most of the time).
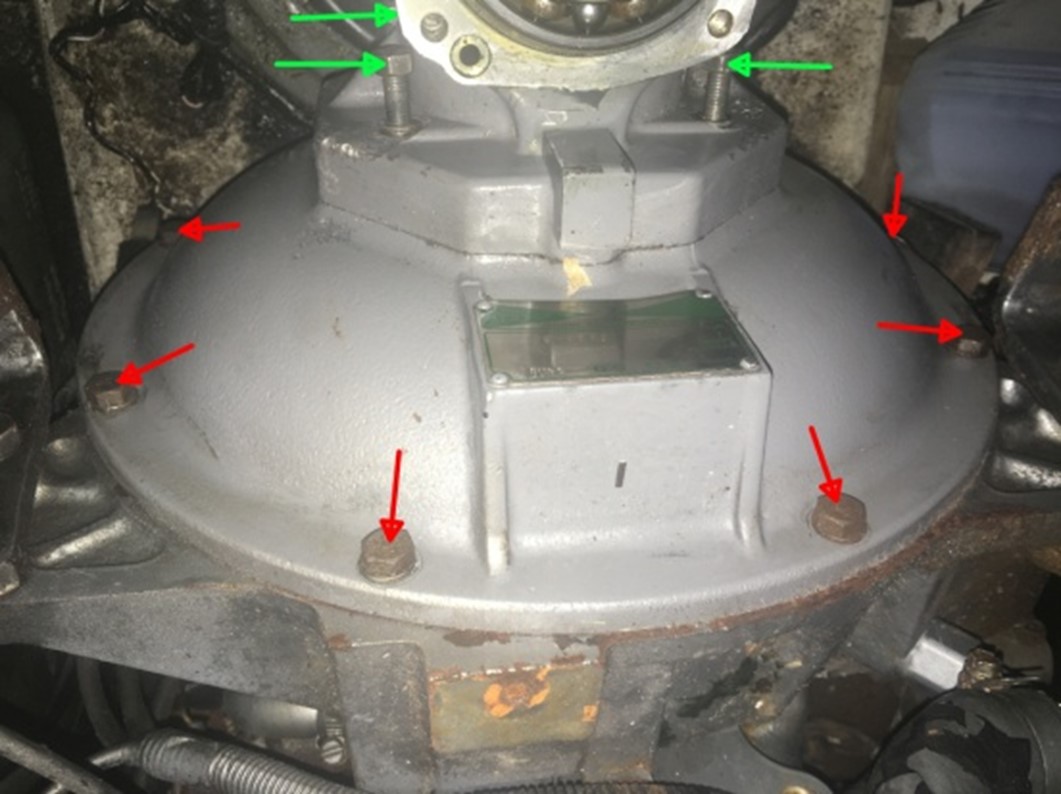
If the 4 connecting screws between the motor and the Saildrive cannot be pushed back, a different procedure is necessary.
First remove all screws of the cup housing (red arrows).
Leave the nuts on the studs of the SD50 flange. (green arrows)

Now the engine is unscrewed from the engine mount (4 screws). The motor is now moved away from the Saildrive by the length of the screw (red arrow) using an assembly iron or pulley block.
Therefore, the nuts must remain on the studs. (green arrows)
Now screw an 8mm ring bolt into the coupling axle and use it to pull the coupling out of the Saildrive housing. A long M8 screw will also do.
Advantage of this procedure: The ship does not have to be out of the water
Possibly the adapter ring T1 is still hanging at the bottom of the coupling. Put this back into the clutch housing.
Disassembling the clutch:
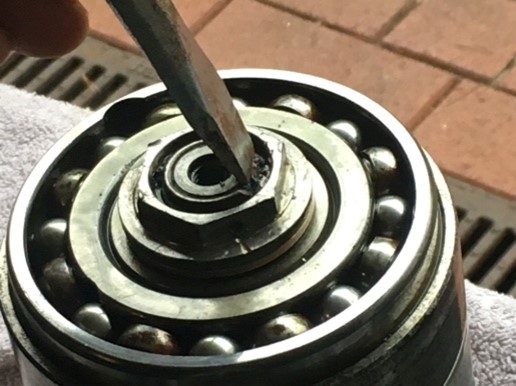
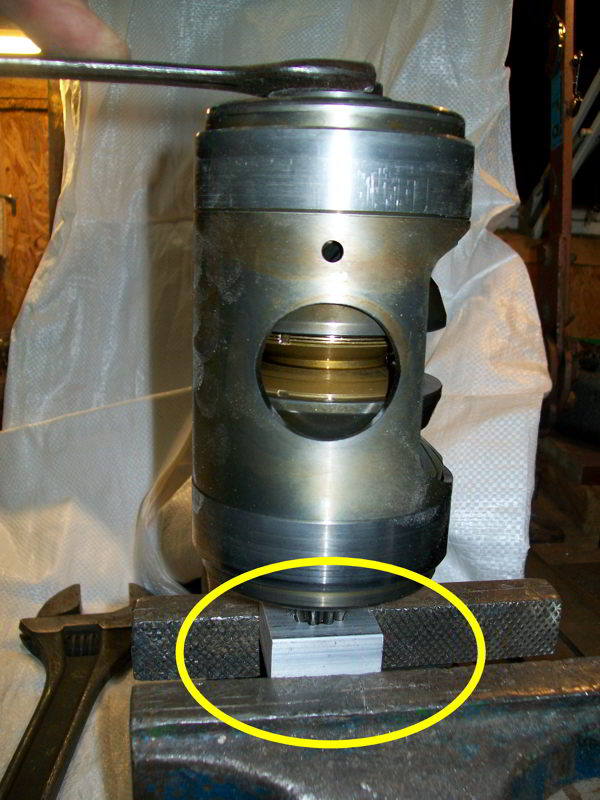
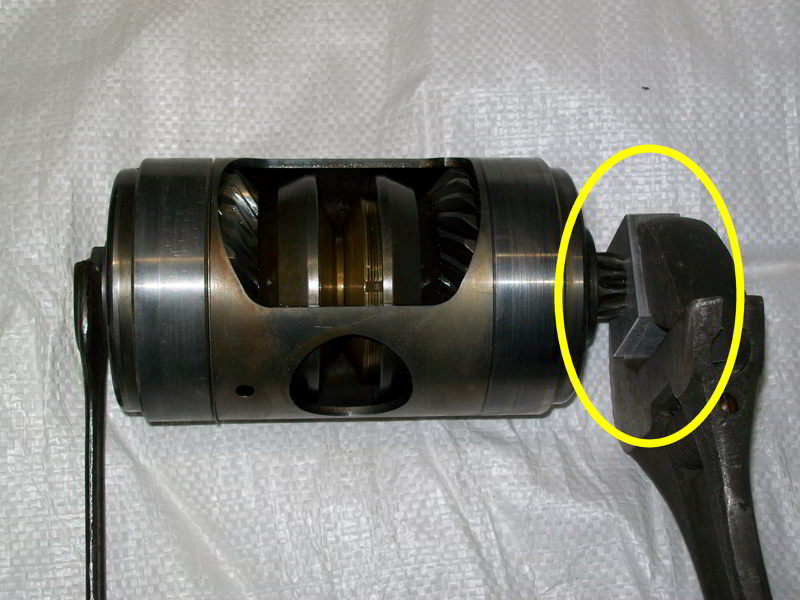
Left: Then use a small chisel to chisel off the deformed portion of the original Yanmar nut (nut lock) so the nut can be twisted off. (Caution, the nut has a left-hand thread, i.e. loosen the nut clockwise). When the nut lock has been chiseled off, the nut is loosened and unscrewed with the 27 socket. This step is not necessary when using the nut from the service kit.
Center: The clutch is now firmly clamped in the vise using aluminum jaws or the spline tool from the SD50 service kit.
Right: On the way, without a vice, the clutch nut is loosened on a firm surface with the spline tool and a large wrench.
TIP: I hate chiseling on the clutch. (hard hits on the axle, metal chips, etc.)
However, if you use the nut from the SD50 service kit, it is secured well with 2 x M4 grub screws and some screw tightener on the thread of the grub screws and the nut. (The nut, thread on the clutch axle and the threaded pin must be well degreased (brake cleaner) so that the screw tightener works properly)
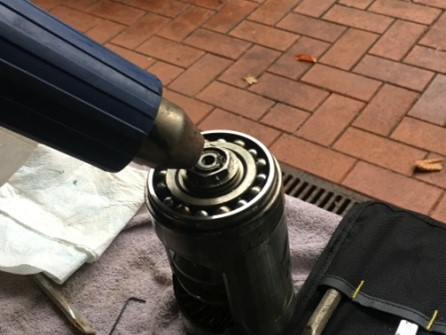
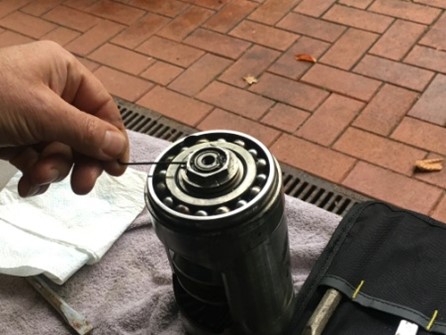
During the next maintenance, simply heat the nut to over 80°C with a hot air gun (it hurts a bit when touched), which loosens the screw tightener. Then unscrew the threaded pins and unscrew the nut clockwise. The nut can then be reused.
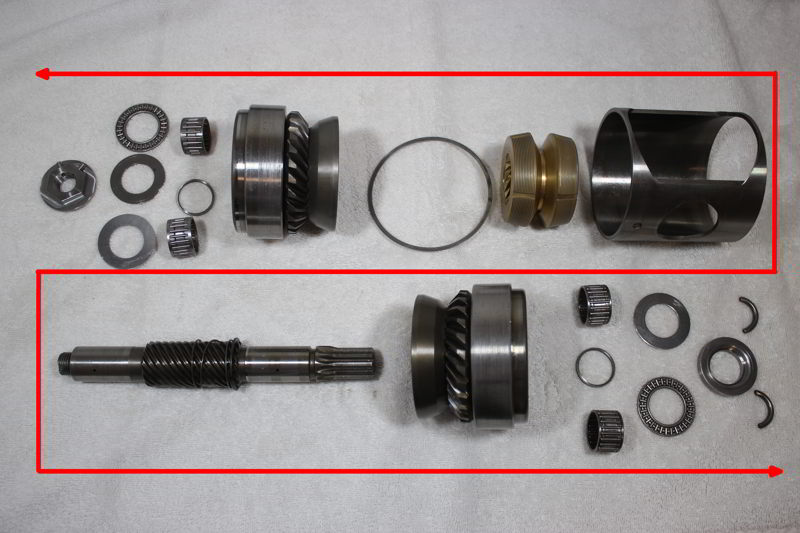
Further disassemble the clutch:
Lapping the clutch:
"Lapping" means restoring the basic roughness of the clutch.
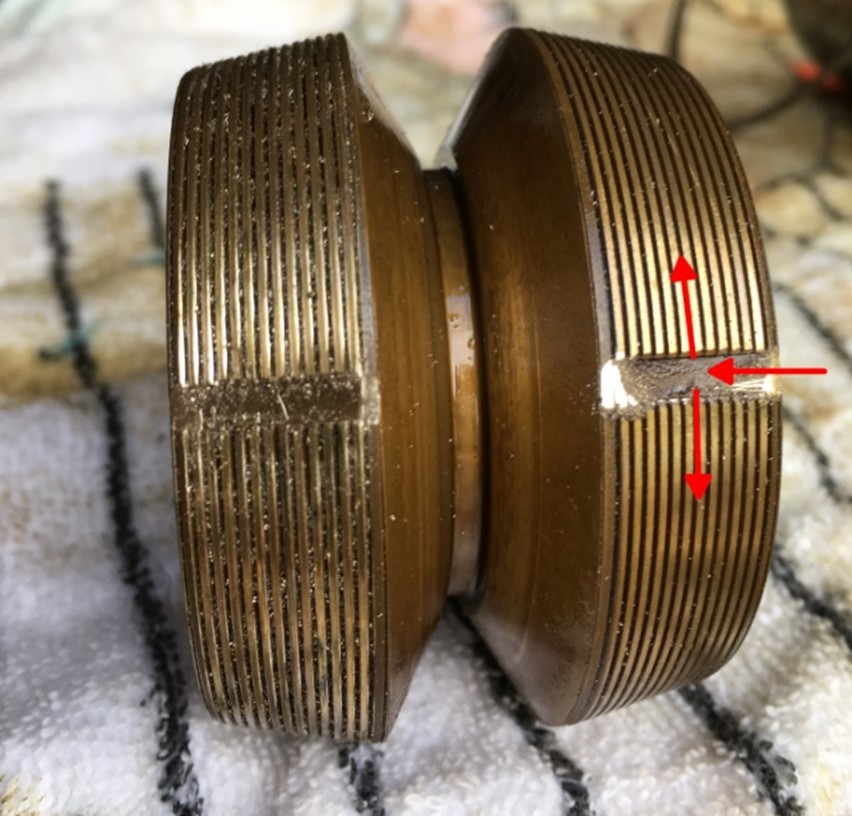
The clutch is fully immersed in transmission oil. It penetrates first into the large and from there further into the narrow channels. Slow running of the machine with a slipping clutch is poison for this type of clutch. The cone clutch heats up and the oil burns in the narrow passages, which then clog. The burned oil acts like a polishing agent and grinds the running surface in the clutch cup. This shortens the time until the next maintenance. If the clutch is heavily soiled with carbon, the oil must also be changed. Many small pieces of carbon swim in the oil and tend to clog the narrow channels, since there is no oil filter in the SD50.
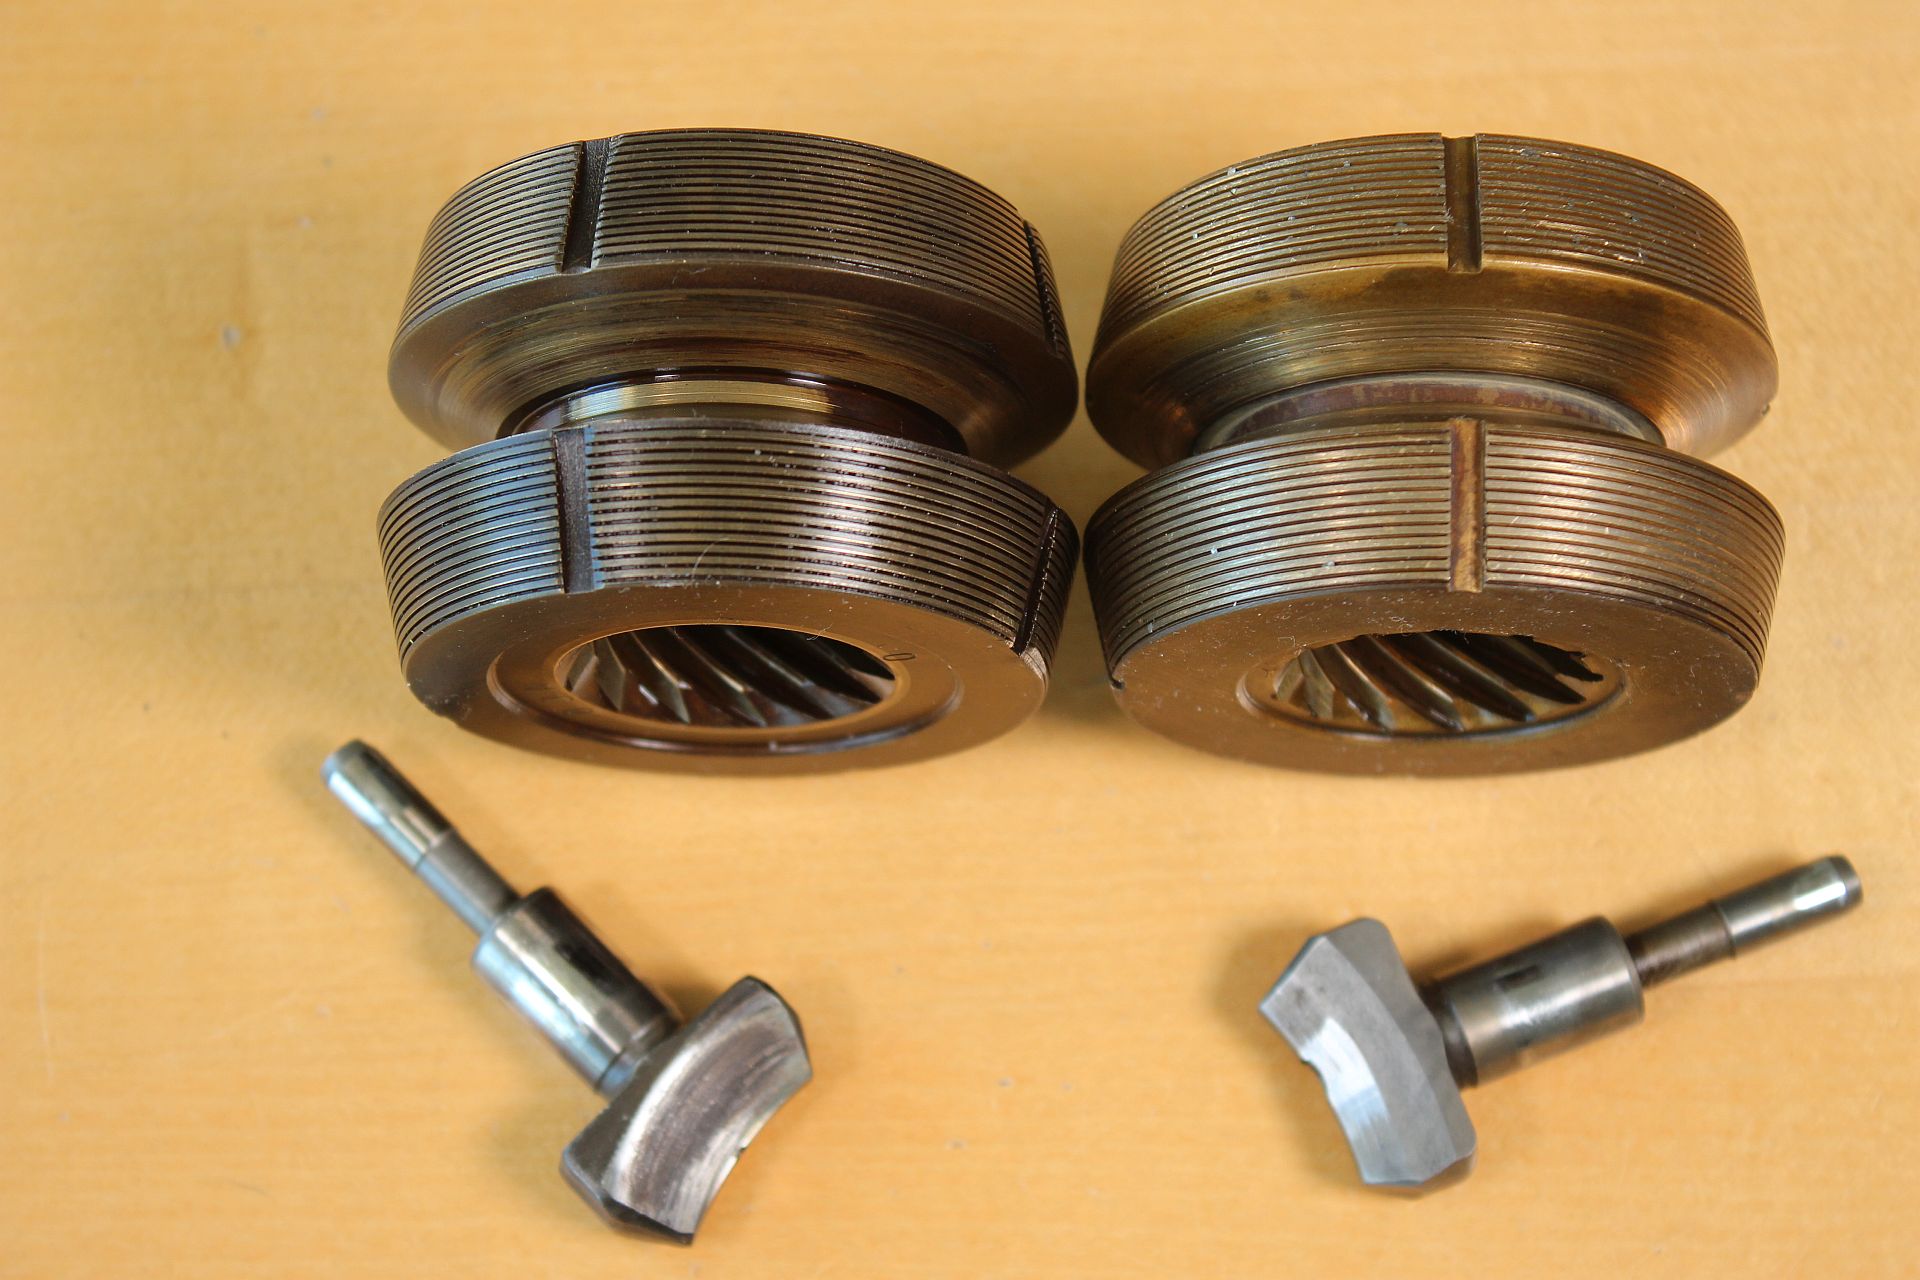
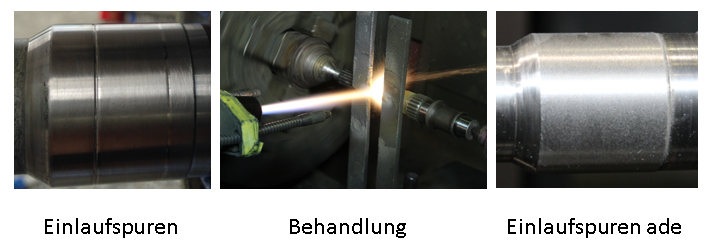
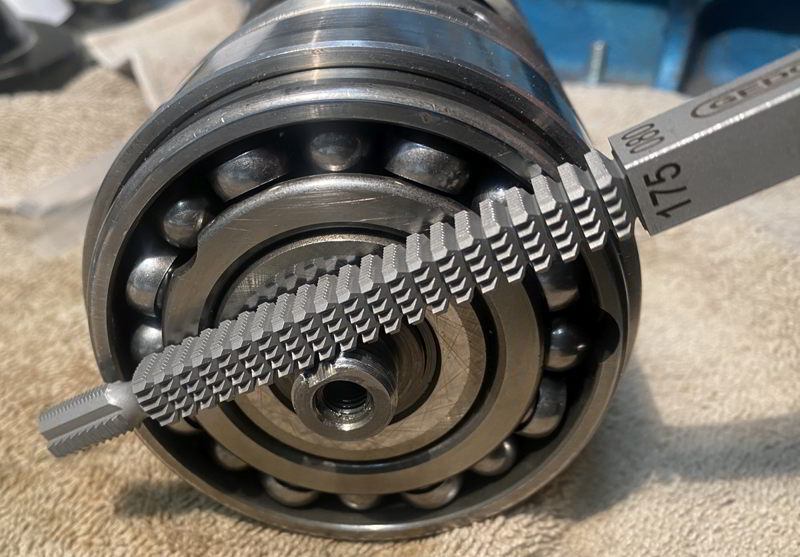
With a small triangular key file, the narrow blade of a utility knife or a very narrow saw, first open the wide and then the small oil channels again. Untreated in the photo above left, treated on the right.
Tip: Now it is clear why Yanmar prescribes the gear idling (neutral) when sailing. The water creates vibrations as it flows around the fixed propeller. These vibrations are transferred to the clutch and grind the clutch cup bare.
Another tip: Always switch quickly (quickly) from neutral to the first level forwards or 1st level reverse so that the clutch has engaged before the engine develops any real power. Always shift from forward to reverse slowly, pausing in neutral. If it bangs in the gearbox, it was definitely too fast.
On the inside of the clutch cup you can see brown deposits == burnt oil (left arrow) with a nice reflection of the brightly polished surface (right arrow)
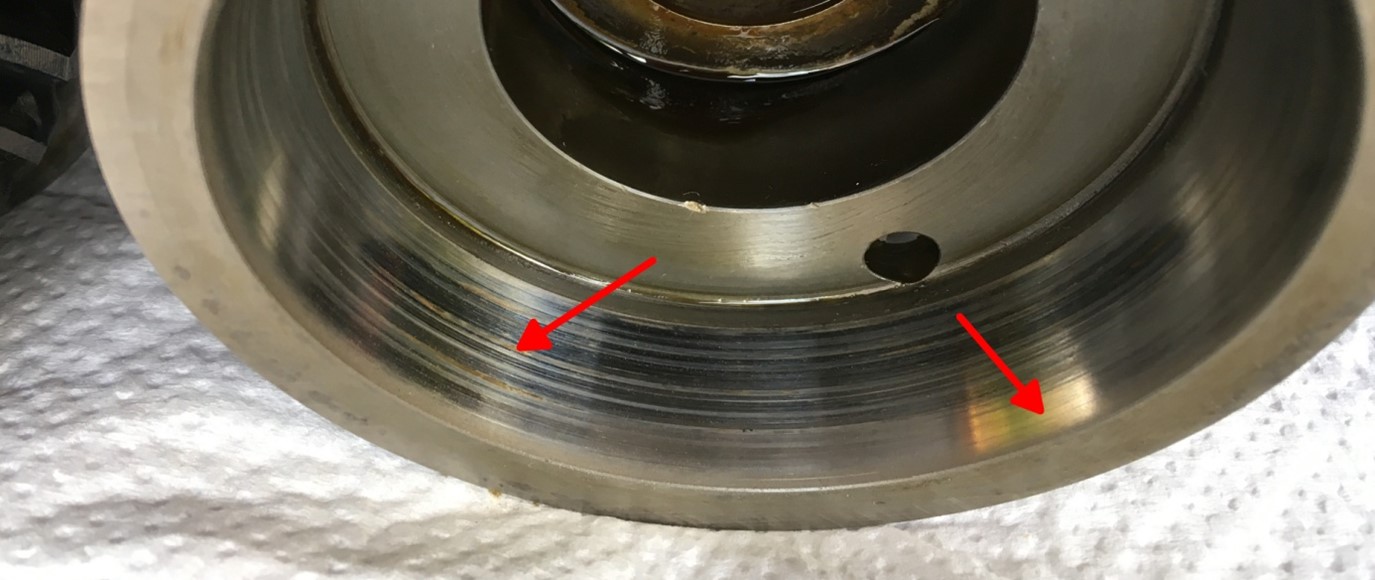
Remove the needle bearings from the cup before lapping!
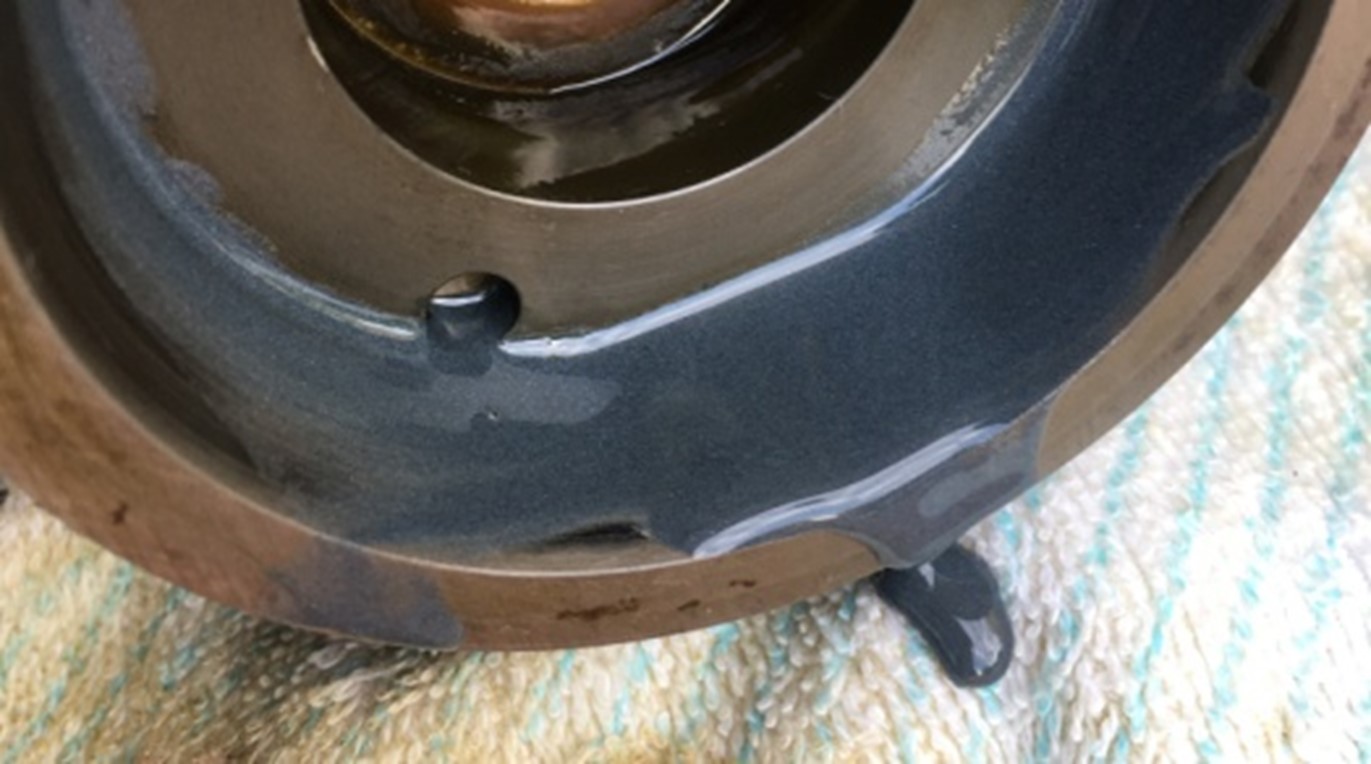
Now the running surface of the cup is wetted thinly with the grinding paste and the clutch cone (with the correct side (*)) is inserted into the clutch cup. The amount shown is distributed over the entire tread. The coupling cone is pressed firmly into the cup and moved back and forth about 10 times by hand, then the cone in the cup is turned a little further. Repeat this process 5 times. This brings you to 50 grinding processes and the clutch cone was turned completely in the cup.
(*) The marked side (e.g. in my case: 4CA) of the coupling cone points downwards when installed in the Saildrive, i.e. it is lapped with the lower cup.
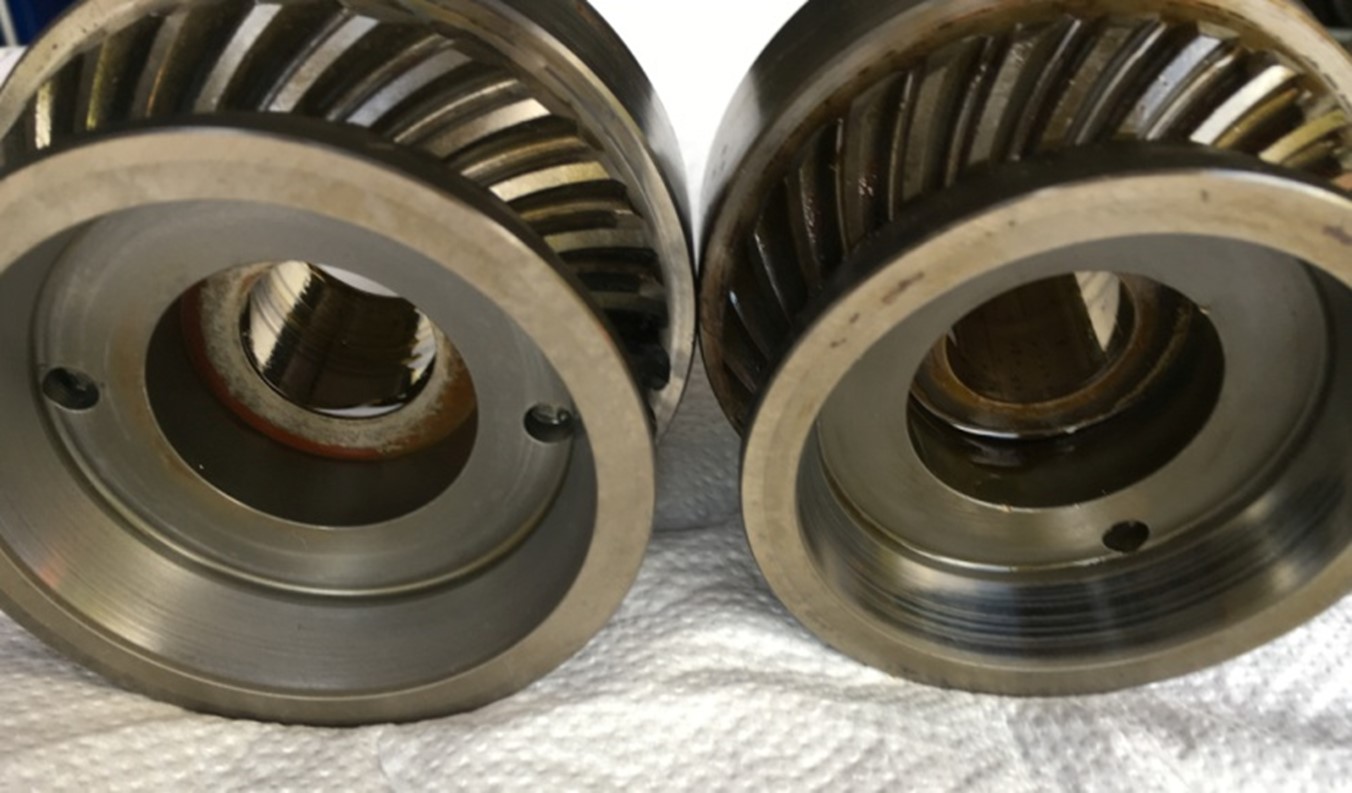
Now wash the cup and cone thoroughly in petroleum ether.
The lapped tread on the left, the untreated surface on the right.
If the running surface shows color changes after lapping, these can be caused by overheating, parts or even the entire clutch must be replaced. (This will be very expensive around 3600€)
Measure clutch cone cup:
When the parts have been cleaned again, you put the cone (both sides and pay attention to the correct allocation cone / cup) in the counterpart (cup) and check the distance L with the caliper. The new size is 29.9mm. The minimum size is 29.1mm.

If it falls below, a new cone is necessary ( (Cone 196326-04251) costs approx. 1300 €)
The clutch play is set to 0.1mm-0.2mm. Depending on the wear of the cone, the undersize > 0.1mm on the respective side of the cone is compensated with shims.
If there is an undersize of <= 0.1mm on one side, this will not be compensated.
Example 1:
Cone with top cup: measured 29.7mm
Nominal size 29.9mm
Undersize = 29.9mm - 29.7mm = 0.2mm
Cone with bottom cup: measured 29.5mm
Nominal size 29.9mm
Undersize = 29.9mm - 29.5mm =0.4mm
Total undersize = 0.6mm. Target is 0.1mm to 0.2mm.
==> Insert 0.1mm shim between bearing washer and nut.
==> Insert 0.1mm+0.2mm = 0.3mm shims between the bearing washer and the lower support bearing.
Example 2:
Cone with top cup: measured 29.8mm
Nominal size 29.9mm
Undersize = 29.9mm - 29.8mm = 0.1mm
Cone with bottom cup: measured 29.5mm
Nominal size 29.9mm
Undersize = 29.9mm - 29.5mm =0.4mm
Total undersize = 0.5mm. Target is 0.1mm to 0.2mm.
==> Do not insert a shim between the bearing washer and the nut.
==> Insert 0.2mm+0.2mm = 0.4mm shims between the bearing washer and the lower support bearing.
With left-handed propellers, the lower clutch cup is for forward travel and the upper clutch cup is for reverse travel. Therefore, the lower part of the clutch cone (the one with the numbers) wears more.
Check needle bearing:
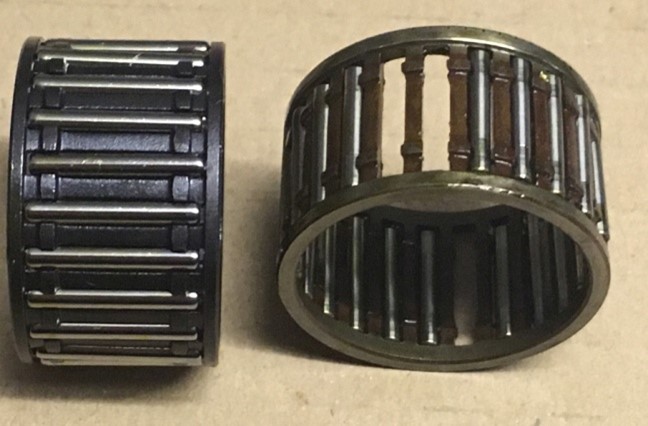
The needle bearings must be checked to ensure that the needles in the cage are complete.
If they fall out easily, all 4 bearings must be replaced. Yanmar requires replacement every 1000 hours.
(Part number: 196322-04781 or industrial type from the service kit)
Assemble the clutch:
When assembling, make sure that the labeled part of the cone is pointing to the right, as shown in the picture below.
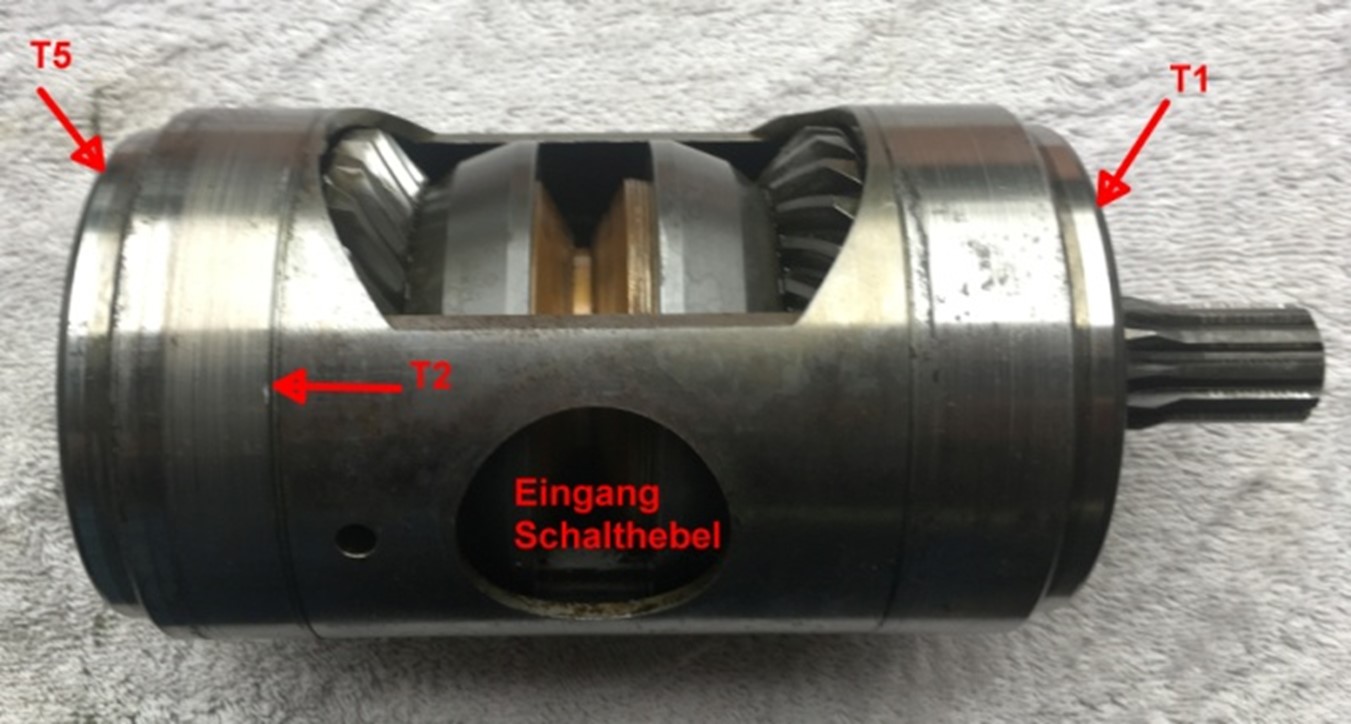
When assembling, make sure that the fitting ring T2 (196320-02230) is in the correct position. T5 (196322-02320) is positioned when the cover is unscrewed. T1 should still be in the bottom of the clutch housing.
Then clamp the clutch firmly in a vise. Don't forget the aluminum jaws or use the spline tool from the service kit!
Install lower support bearing:
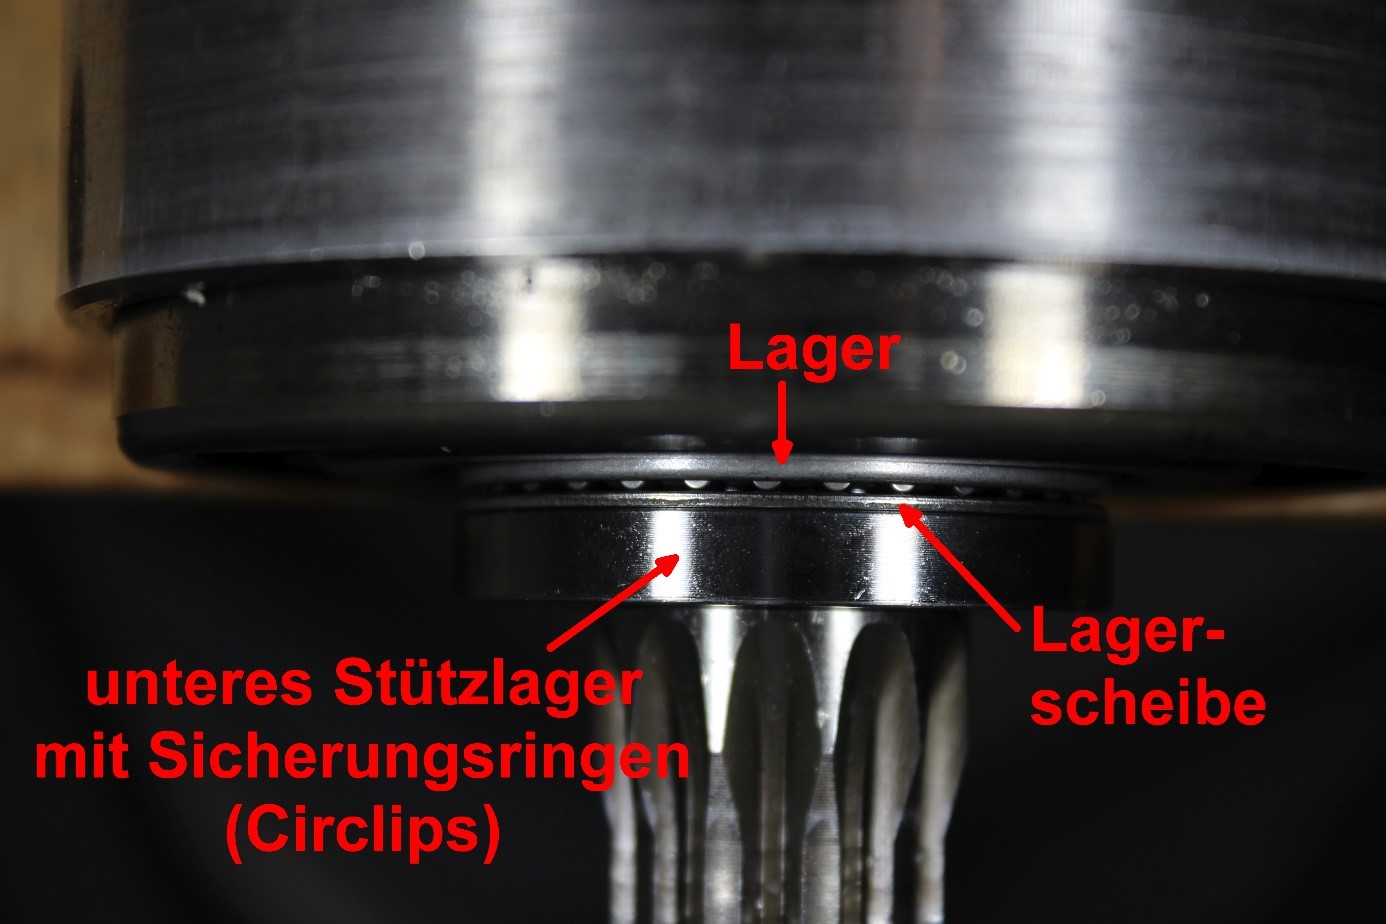
First the thrust bearing, then the bearing washer and then the support bearing is pushed onto the axle. Insert the two circlips and move the axle slightly in the direction of the nut. Because the dimension here was 29.8mm, no shim was used here. The original circlips will continue to be used. The axle now rotates in the thrust bearing and no longer at the position of the locking rings.
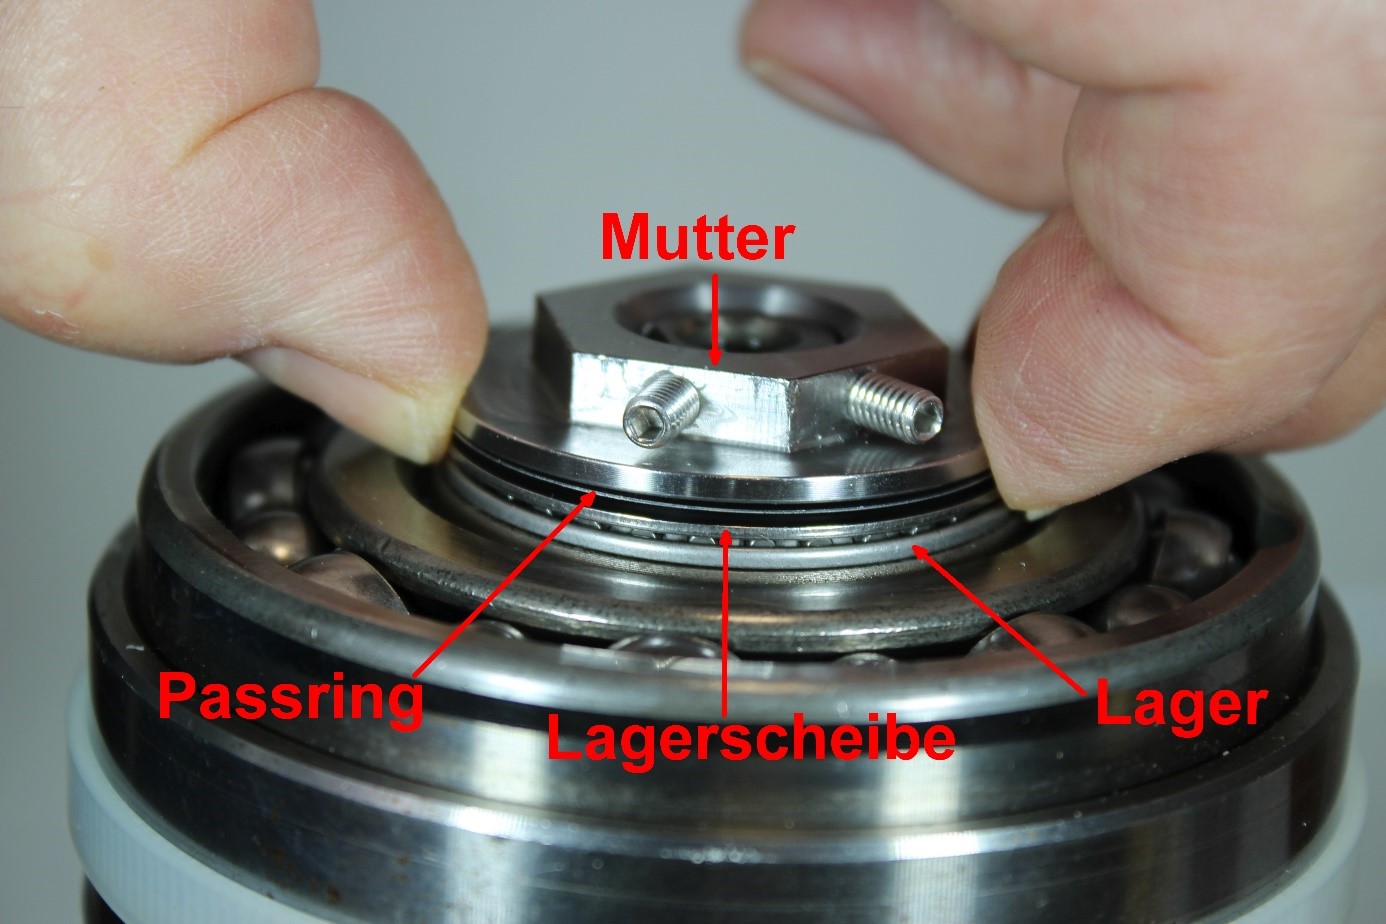
On the clutch side, place the 2nd axial bearing, the bearing washer and the fitting ring on the axle and carefully screw on the nut. Keep the bearing in the middle with the washer and the fitting ring.
Then clamp the clutch firmly in a vise. Use the spline tool from the service kit!
Measure clutch play:
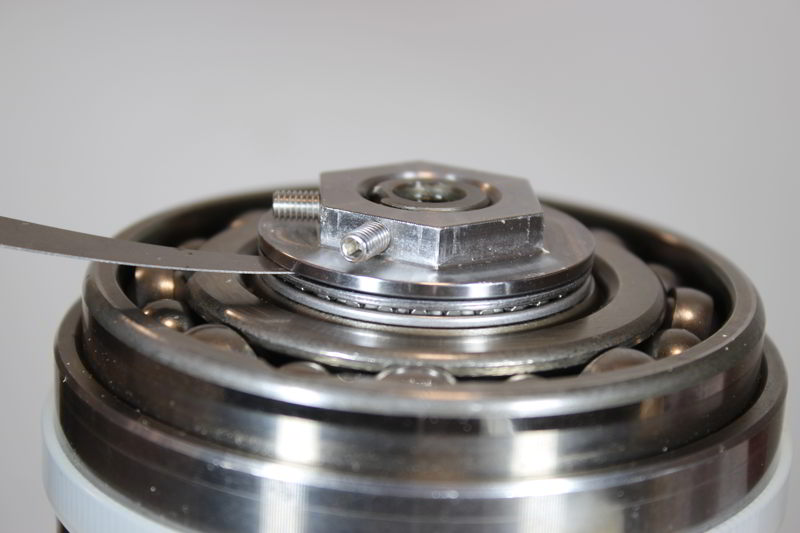
Tighten the nut only slightly. Measure the free clutch play with the feeler gauge between the bearing washer and the nut.
Then set the remaining play with the fitting rings and the feeler gauge to approx. <= 0.2mm.
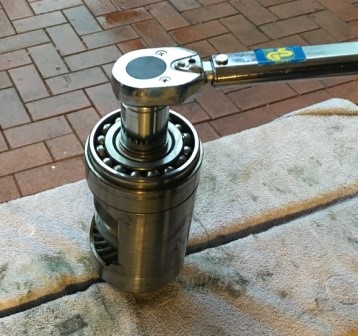
Clean nut and thread oil-free (brake cleaner). Then coat with screw lock and tighten to 145Nm with a torque wrench. Check the free play again.
Then tighten the two setscrews with the Allen key. Let the screw lock dry according to the manufacturer's instructions.
Note: The usual torque wrenches available here are designed for right-hand threads. This means they only measure for right-hand threads.
This can also be done with a standard luggage scale (50kg). The torque key is 43cm long. Place the luggage scale at a distance of 40cm. Simply pull 145Nm /0.4m = 362,5N /g (g = 9.81m/s2) ==> 37kg on the luggage scale, then you have tightened the nut to 145Nm.
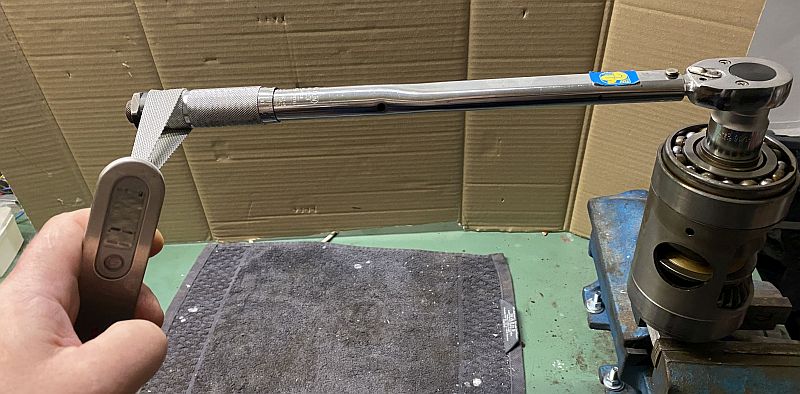
Lap the clutch along the way:

In order to disassemble the clutch on the go without a vice, at least a pipe wrench or wrench is required. The spline tool is placed on the splined shaft of the coupling and held with the pipe wrench. The nut can then be screwed on or off with the torque wrench and the 27 socket.
Insert clutch:
Screw the 8mm ring bolt back into the coupling. Apply a thin layer of oil to the clutch (engine oil) and ensure that the fitting ring T2 does not protrude. (see arrow in left picture). You can also pull a wide plastic cable tie over the fitting rings.
If the coupling does not sink completely into the housing of the SD50, simply turn the eyebolt slightly until the coupling sinks completely into the housing.

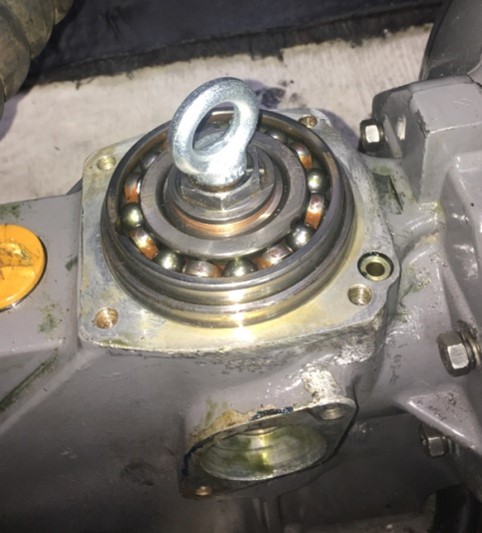
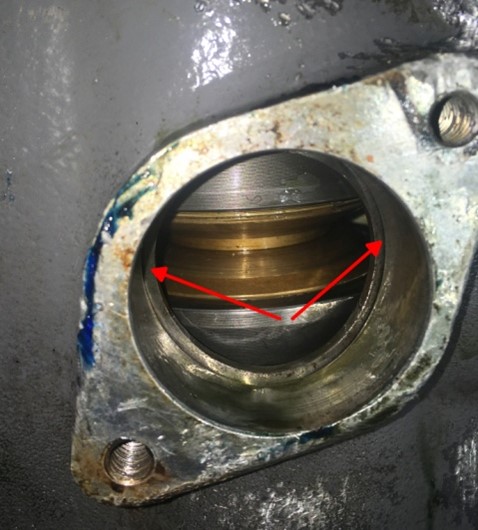
The round opening of the clutch housing must not cover the opening for the shift lever on the SD50 housing. Align evenly. You can feel it with your fingers. (See picture on the right)
Install clutch lever with shifter:
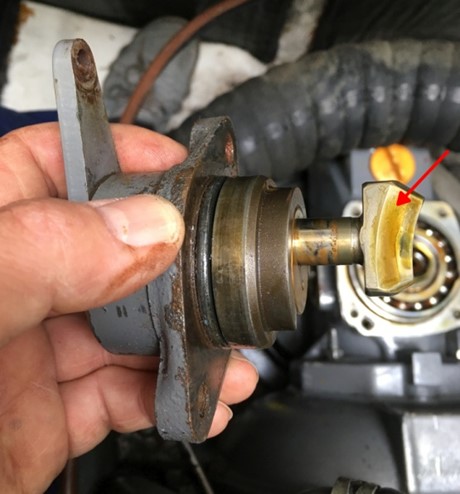
Insert the shifter with the wide part to the stern (see arrow).
Then fix the clutch lever with the two screws.
Adjust shifter:
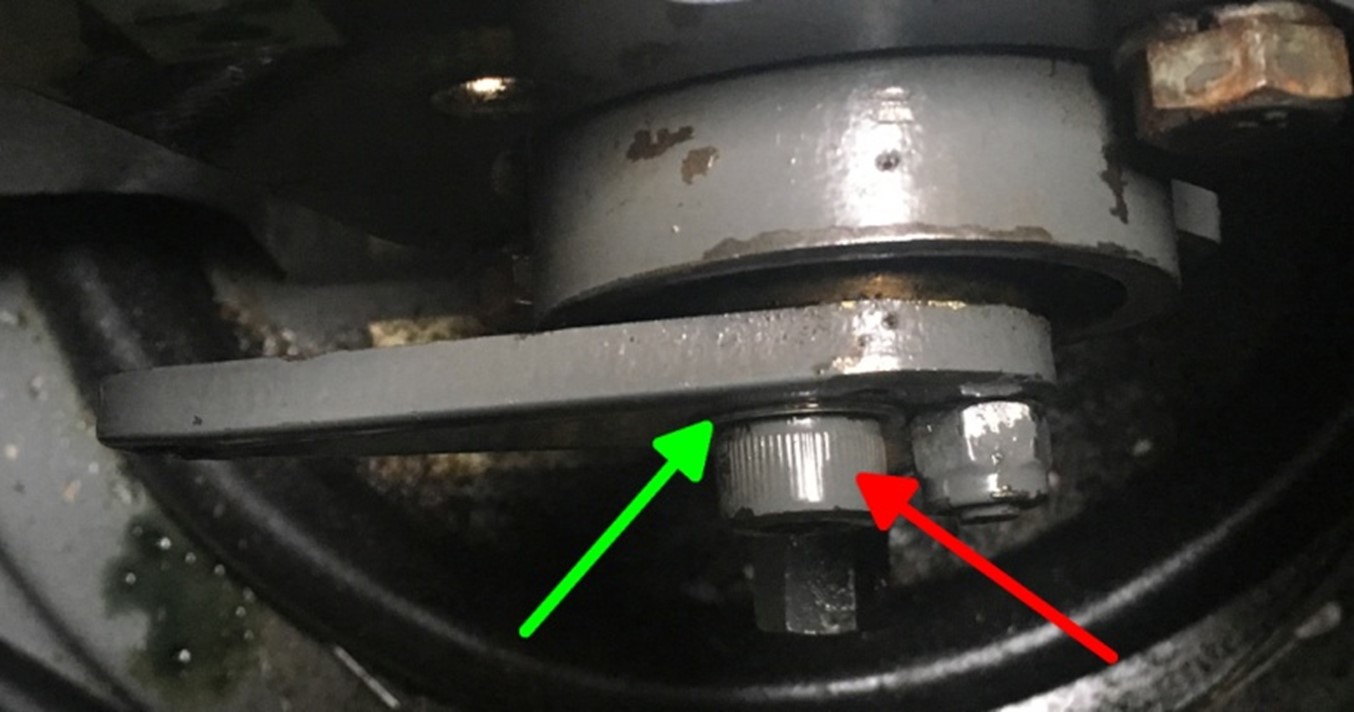
When the shifter is screwed back on, the M8 Allen screw (red arrow) is removed. Be careful not to lose the fitting rings (green arrow). Set the shift lever approx. 10°-15° to the left of the neutral position. Then the gearshift lever is retracted into the clutch at the lowest point.
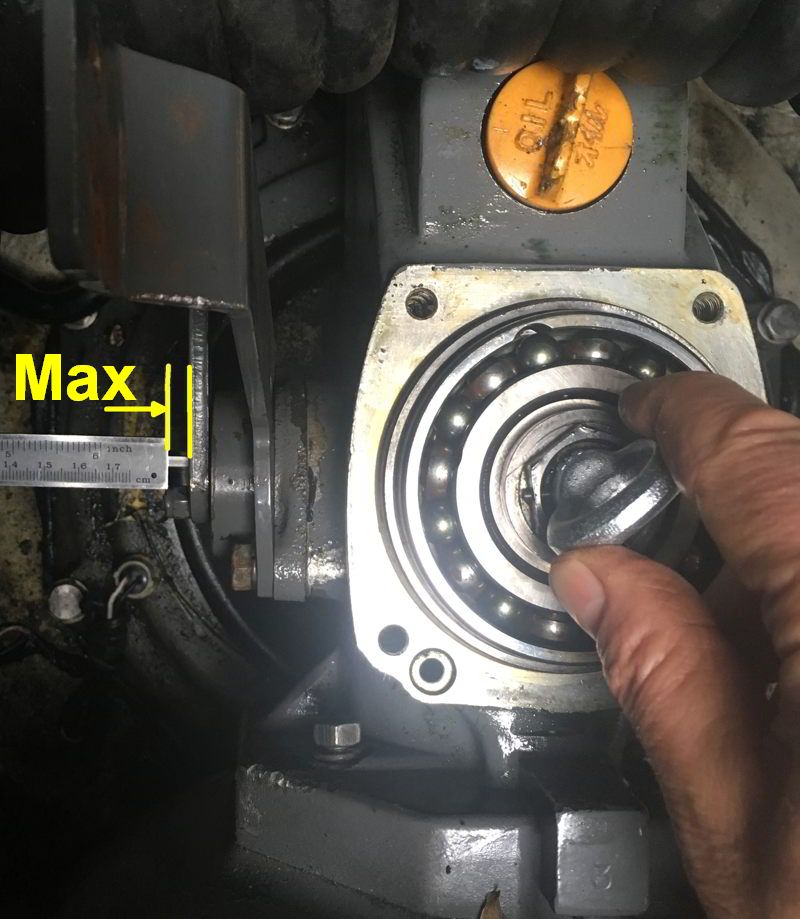
The cone clutch is never centered. In order to determine the smallest depth L, the coupling axis must be turned using the ring screw until the depth gauge of the caliper protrudes furthest out of the hole. See left. Now leave the coupling axle in this position.
The axis of the shift lever has a recess in the middle. Be careful, don't even measure with and without the indentation. See next picture.
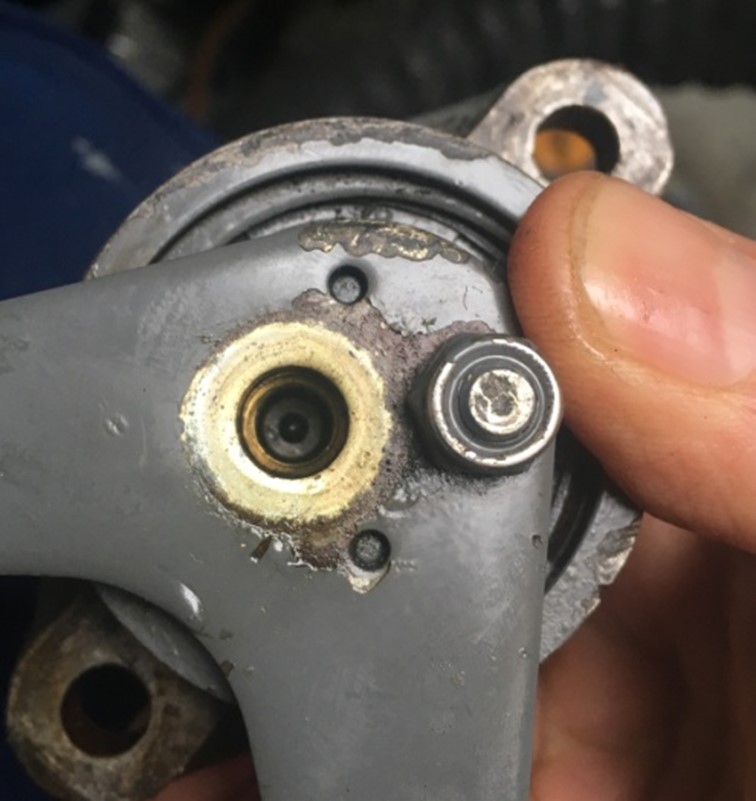
Then use the caliper depth gauge to measure the depth L at the position of the Allen screw. Be careful, the shift finger has a depression in the middle (see picture on the left). The depression must not be measured.
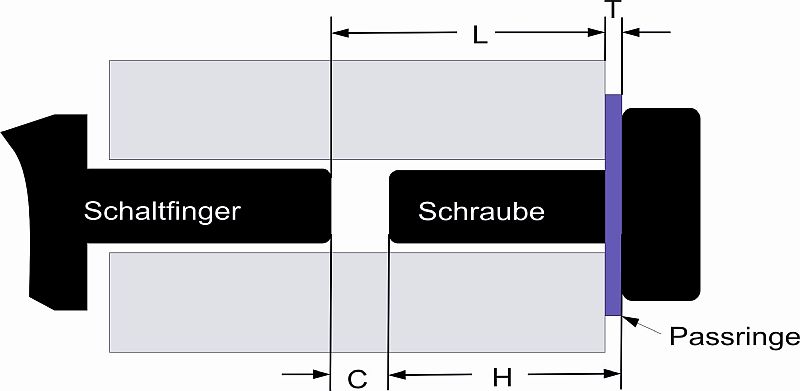
The thickness of the shims is calculated:
T= (H + C - L) (+/-0.1mm)
with
L = depth to the shifter (standard approx. 16.35mm)
H = screw length (standard approx. 17mm)
T = Thick shim rings (standard approx. 1.2mm) consisting of 6 x 0.2mm fitting washers
C = Distance between screw and shifter (standard = 0.3mm +/- 0.1mm)
Example: Screw measured 17.1mm; Depth of shifter measured 16.9mm; C should be 0.3mm.
==> T = 17.05mm +0.3mm - 16.9mm = 0.45mm (+/- 0.1mm) ==> Select fitting ring thickness 3x0.2mm = 0.6mm and screw on with the M8 Allen screw.
Do not throw away any fitting rings that are left over. If a new cone or shifter is installed, 6 fitting rings must be installed again.
Use your hand to shift the gear lever back and forth and check for free movement. While doing this, turn the eyebolt on the axle. There should be no awkward shifting; the end positions of the shift lever must be reachable without excessive resistance. Check using the permanent marker markings from the removal! In the end position of neutral, the shift lever sinks slightly into the Saildrive housing.
During the later, final test, this behavior of the shift lever is checked again.
Detect worn cone/shifter
The shifter sits in the middle of the cone and pushes it into the upper or lower cup to move the propeller forward or backward. A shift finger is also subject to wear. Here is a shifter after approx. 800 hours of operation. The shifter is only slightly polished. There's nothing to see at the top. That's how it should be.
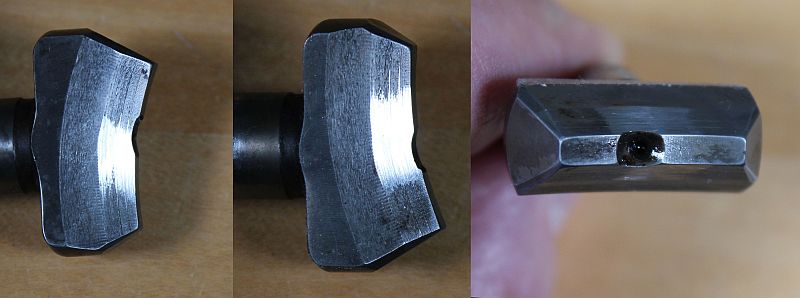
A worn shifter can be seen in the following pictures. On one side, the polished surfaces go completely over the grinding surface; on the back, the shifter only has contact with the cone in two narrow places. Grinding marks can already be seen at the tip. With this shifter the clutch could no longer shift. The clutch slipped. This shifter has reached the end of its function and must be replaced. (Yanmar part no. 177088-06390 approx. 200€)
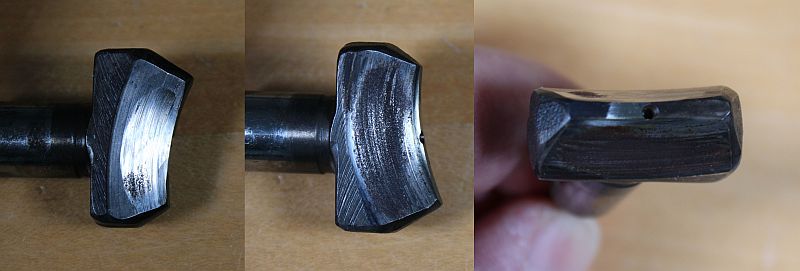
A worn shifter hits the inner ring of the clutch cone.
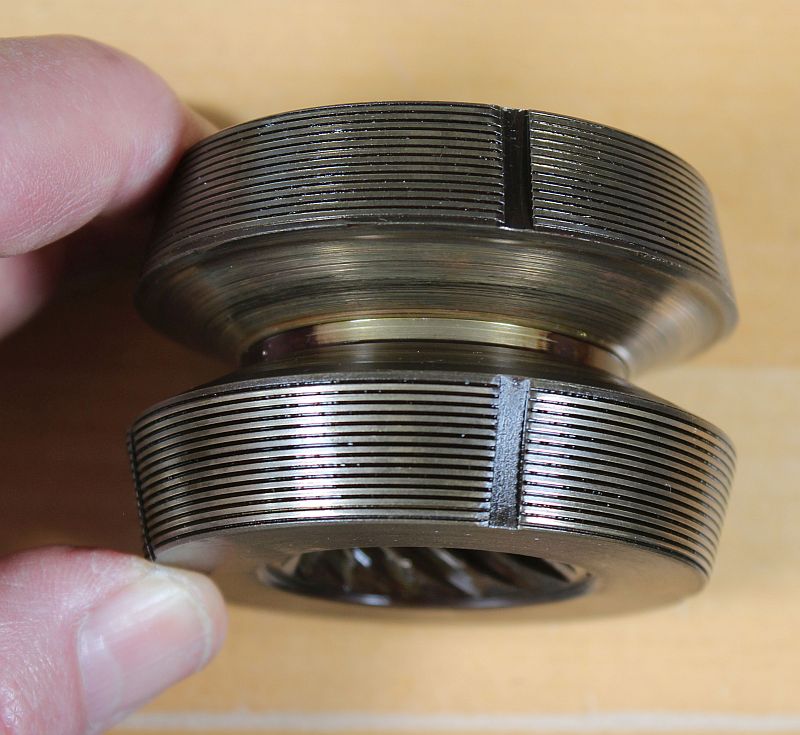
A clutch cone, even if it is not yet undersized, can have further wear and tear that makes it impossible to shift the clutch.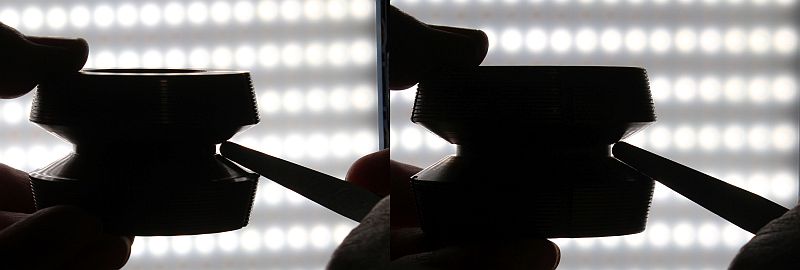
Left: surface ground by the shifter
Right: Area of an 800h operating hour clutch cone.
The clutch cone still has 29.3mm and 29.6mm but with the errors shown previously, together with the shifter, it has reached the end of its functionality.
Screw the transmission flange back together:
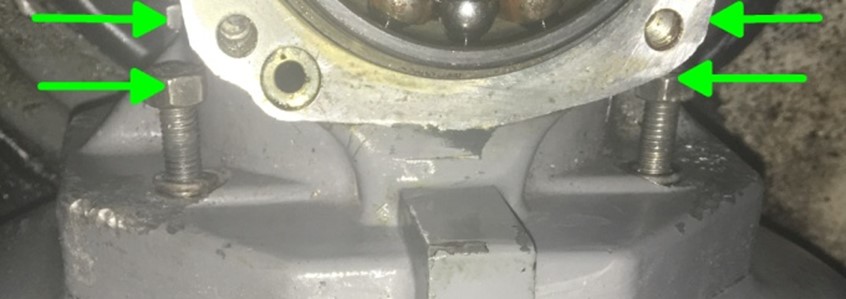
Retighten the 4 screws (green arrow) of the SD50 gearbox flange crosswise. The screw bolts then protrude approx. 2.5 cm from the gearbox flange. If the nuts cannot be tightened enough, simply turn the eyebolt a little so that the pinion slides better into the clutch gear.
Customize gearbox cover:
At least before the first use of the new nut with bearing, the recess in the cover of the Saildrive must be turned from 39mm to 43mm in diameter. This adjustment should be at least 5mm - 6mm deep.
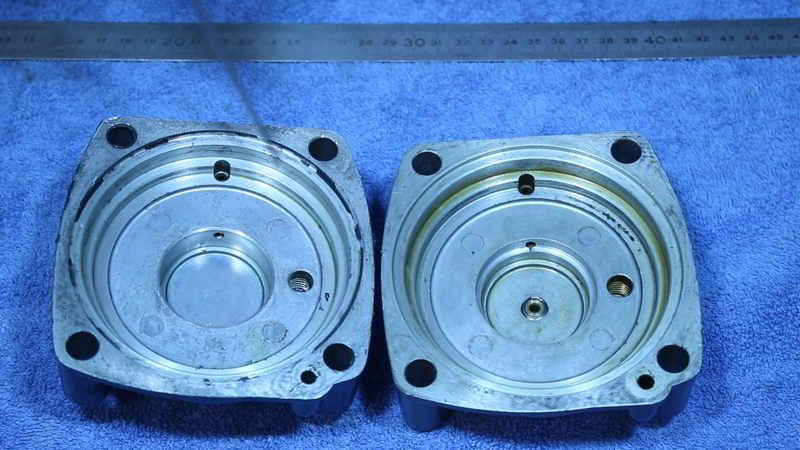
Left: original cover.
Right: extended lid
It's good to have an agricultural machinery service station in the neighborhood. The repair shop of a shipyard can also do this.
By hand with a Dremel or drill this is more complex but doable.
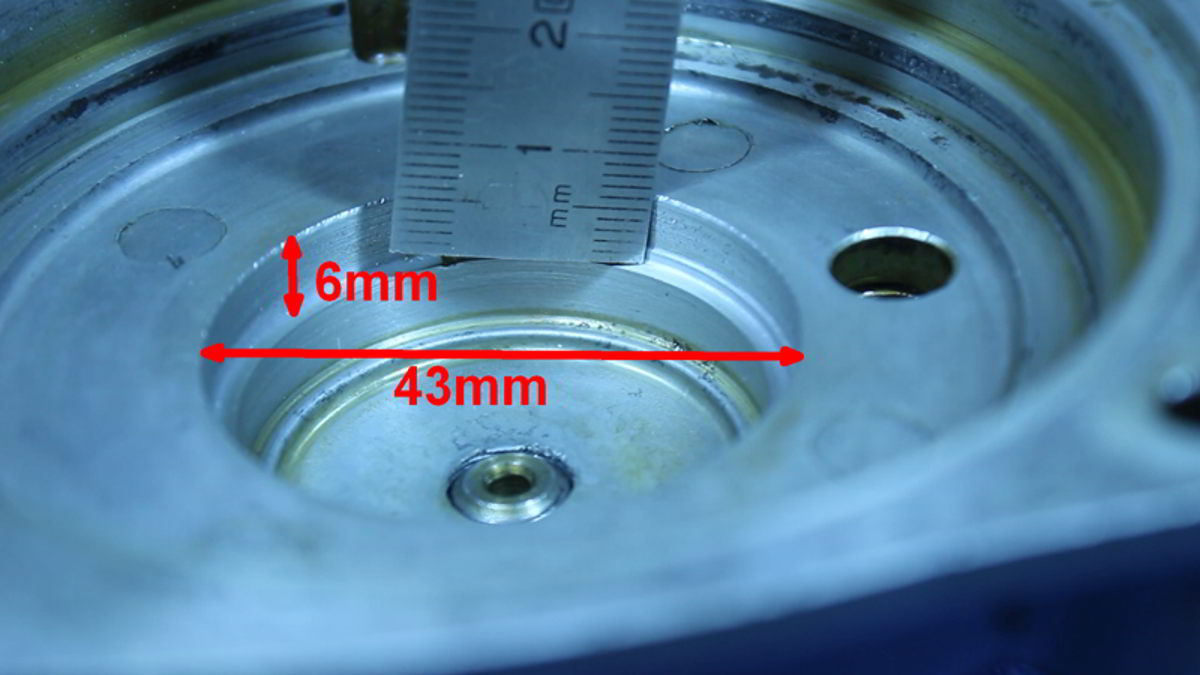
If you leave the ship for a few days, the cover can be easily removed with the 4 screws and taken with you. A lathe shop is quickly found.
Make the extension yourself:
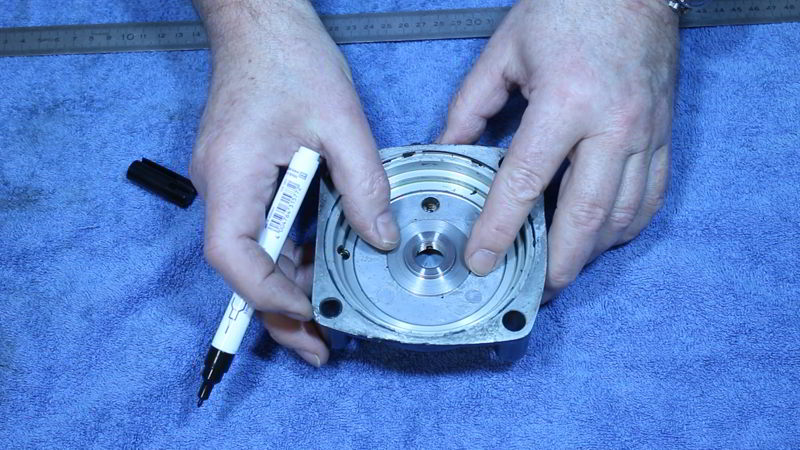
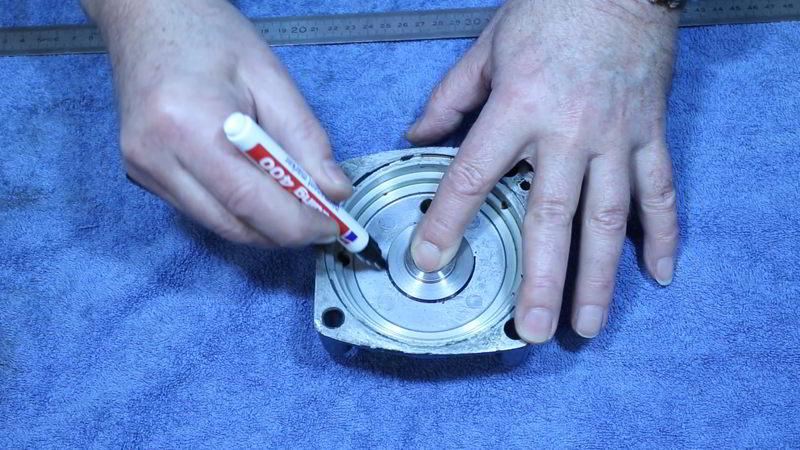
The nut is placed centrally on the recess as shown. It has a small edge and is automatically centered. Then draw a line around the nut with a fine permanent marker. Then use a router bit to widen the recess to the drawn circle. The extension should be 6mm in depth. To test, place the cover on the Saildrive with the clutch installed and rotate 360° with the gear engaged. If the cover can be placed tightly and rotated 360° without resistance, enough material has been ground off. Do not remove too much. After the adjustment, the cover has only 3mm - 4mm wall thickness in the recess.
Install transmission cover:
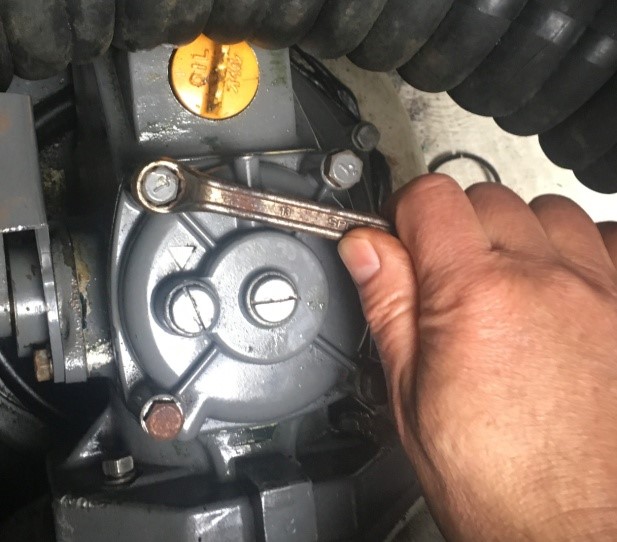
Now insert the two O-rings and the fitting ring T5.
Then insert the clutch cover and tighten the 4 screws crosswise.
Now screw the shifter cable back onto the holder. The shifter cable sheath has a notch, the mounting bracket has a lug. The shifter cable is attached with the lug in the notch. The gear cable core is attached to the shift lever with a cotter pin. There are no other setting options here.
Screw the gearbox and motor back together:
If the transmission cup screws had to be loosened:
Move the motor closer to the cup housing using the assembly iron or pulley block so that the screws grip again.
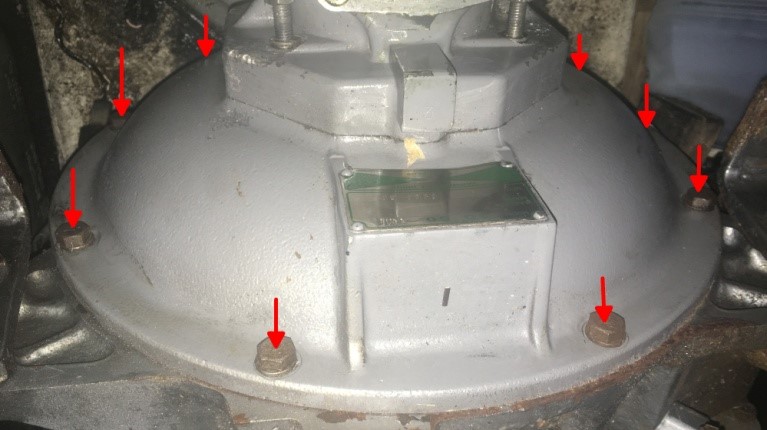
Then tighten the screws of the gearbox cup crosswise so that the engine is pulled towards the cup.
Then align the engine to match the engine mount and tighten the engine mount screws.
Final test:
As in the chapter "Adjusting the shift lever", the transmission of the states forward, neutral and reverse is now checked on the clutch lever of the SD50.
1st test: Without running machine:
At the helm, an assistant adjusts neutral to forward 1st stage and back to neutral, as well as neutral to reverse 1st stage and back to neutral. The end positions of the shift lever forward, neutral and reverse on the sail drive must correspond to the permanent marker markings from the removal. This is the only way to ensure that the clutch is fully closed in the 1st stage.
2nd test: With the machine running:
At the helm, an assistant adjusts neutral to forward 1st stage and back to neutral, as well as neutral to reverse 1st stage and back to neutral. Already in the first stage, propeller water must be clearly seen and felt in the corresponding direction (movement from the boat.
If the shift lever does not completely follow the settings from the helm station, check the installation of the shift cable on the sail drive. The gear shift cable must then be checked at the control station and, if necessary, readjusted so that the shift lever moves as described in the "Adjusting the shift lever" chapter.
If the clutch lever does not completely follow the settings from the helm station, the installation of the shift cable on the Saildrive should be checked. The gear shift cable must then be checked at the control stand and, if necessary, adjusted so that the clutch lever moves as described in the "Adjusting the shift lever" chapter. The clutch lever was moved to the end positions by hand and wandered a little into the gearbox housing.
Fill up the oil again and check the oil level (see below "A word about the oil level in the SD50").
Now fill up the gear oil according to the instructions in the manual. For information on the oil level in the SD 50, please read the next chapter first.
A word about the oil level in the SD50:
Have you ever noticed traces of gear oil on the sail drive sealing flange? This could indicate an incorrect oil level in the SD50. Then read the instructions "Converting the Yanmar SD50 Saildrive without pressure".
"A word on gear oil"
The SD50 operating instructions refer to Mercury Quicksilver High Performance Gear Oil. As far as is known, this oil is not only attributed an exorbitant price, but also very good water-binding properties. I can confirm both.
If you always change the Simmerrings on the propeller of the Saildrive together with the underwater paint, so every 2-3 years, you can do without these properties and use SAE 90 GL3 or GL4 gear oil instead. This costs only 10% - 15% of the Quicksilver oil price and is perfectly adequate for the loads in the sail drive.
Never use GL4+ or GL5 or even higher alloyed oils. Not only are these more expensive, but they are definitely not good for the cone clutch.
And now for the technicians among the sailors:
An API GL4 lubricant contains additives specifically for manual transmissions. Manual transmissions contain non-ferrous metal (synchronizer rings). The friction of a GL4 oil must not be too low, otherwise the synchronizer ring will slip and shifting will become impossible. If the friction is too high, the shifting becomes notchy and scratches. The cone in the SD50 clutch is made of non-ferrous metal. Too little friction would cause the clutch to slip easily.
Also do not use GL4+ or GL4/5. This is thin like GL5 and doesn't contain as harsh additives.
An API GL5 lubricant contains special additives for highly stressed gears, such as E.g. hypoid gear. These gears have curved teeth. In addition to some advantages, this type of gearing has the disadvantage that the surfaces not only roll off each other, but also slide a little. This places increased demands on the material and requires the oil to have high lubricity. The additives contain sulphur, which in turn attacks non-ferrous metals.
In gear or in neutral when sailing?
The wildest reasons why the gear should be engaged or the gearbox should run in neutral are circulating on the internet. In certain cases I agree to the Yanmar instruction. In the case of a fixed-pitch propeller, the gear must run in neutral. With a folding propeller, it is necessary to check whether a folded propeller transmits vibrations to the gear coupling.
Reason: If the gear is engaged while sailing, the water flows around the ship's propeller in a turbulent manner and generates vibrations. The vibrations are transmitted to the clutch cone, which sits in the clutch cup. These vibrations create small movements that polish the clutch cup and cause the clutch to lose engagement. The result is a slipping clutch.
Fake argument: "Not properly lubricated". It is claimed on the internet that the sail drive would not be properly lubricated if it were to run in the neutral position while sailing. In the user manual of the Saildrive SD50 in chapter 2 "Technical specification" under lubrication system "Oil bath type" is mentioned. With this type, all moving parts are always surrounded by oil. A pump is not necessary. So this argument is wrong.
Fake argument: "High wear". What is meant to wear out when the water flow drives the propeller and gear up to the clutch? The force is far too low to cause wear.
Conclusion:
Owners who dare to use the clutch should, in addition to some technical experience, also have a feeling for technical components. Reading a calliper shouldn't cause any difficulties, but neither should working with grinding paste and a torque wrench. Anyone who does not have these skills should contact a service workshop. Through these work instructions, the owner knows the necessary work steps and how to recognize unnecessary (and expensive) steps by the mechanic and, if necessary, prevent them.
For example, installing a new clutch cone, while not undersized, will bring more money to the service shop. Some sailors have already told me about it.
Have a good trip and fair winds
Disclaimer:
These instructions were carried out and written to the best of my knowledge and belief based on a repair/maintenance I carried out myself.
The instructions were carefully created and checked by me. No liability is assumed for the use of these instructions or for damage caused by these instructions.
Copyright:
Jochen Brickwede in December 2023


