Convert SD40 / SD50 Saildrive without pressure
(Saildrive oil change floating in the water)
Have you ever noticed traces of gear oil on the sail drive sealing flange? This could indicate an incorrect oil level in the SD50. Do you change the oil yourself as part of the annual maintenance and follow the instructions in your operating manual? Do you have the oil changed at a Yanmar service workshop? But even the service workshops do not all read the Yanmar Technical Bulletin.
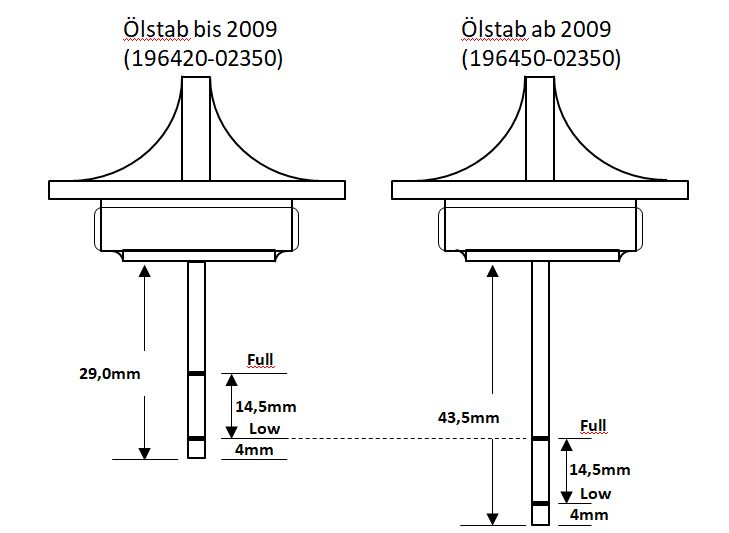
The oil level in the SD50 is redefined in the Yanmar Technical Bulletin MSA 09-017 (dated 16.9.2009).
So check whether your SD50 has a long or short dipstick and only fill the SD50 up to the low mark on the short dipstick or up to the full mark on the long dipstick. As the SD40/SD50 heats up during operation, pressure builds up in the gearbox. This pressure could escape through the drive shaft seal (to the engine). Gear oil can escape as well. During the subsequent cooling, a negative pressure could arise in the SD40/ SD50, which could suck in water at the propeller sealing ring.
Due to the change in the oil level and the associated increase in the ratio of air to oil level in the SD40/SD50, the pressure conditions are more favorable and the risk of water-in-oil leakage is lower. Yanmar has also released a new dipstick for this purpose. A new dipstick can be ordered from Yanmar Service using part number 196450-02350.
What would happen if the sail drive could be kept depressurized during operation, no oil escaped from the engine oil seal and the oil level could still be at "maximum" level? With the following instructions, the SD40/ SD50 Saildrive is converted so that it remains depressurized during operation.
Parts list:
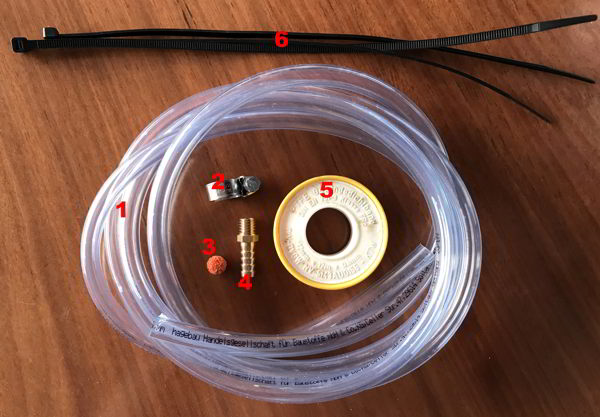
1: 10mm PVC hose, 2m long (hardware store or spare parts box on board).
2: Stainless steel hose clamp for 8mm hose (hardware store or spare parts box on board).
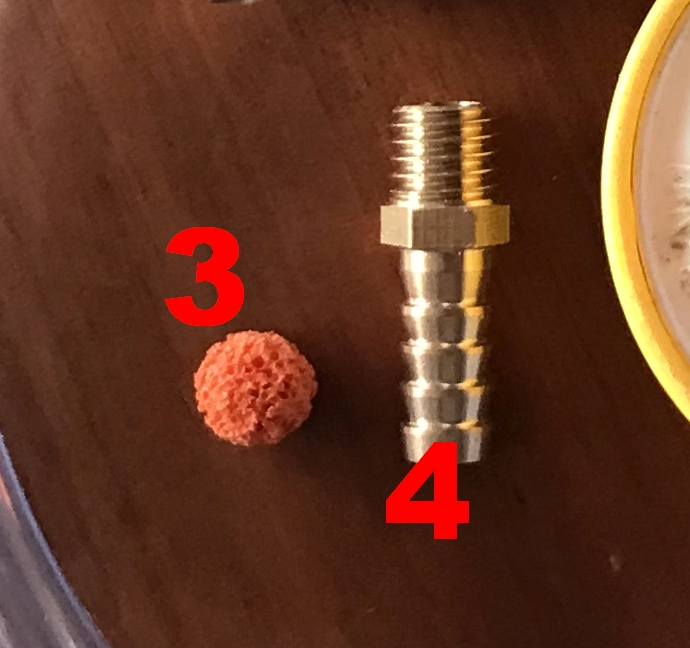
3: Ball sponge for 10mm hoses (service kit)
4: hose connector M10x1.5-10mm (service kit)
5: Teflon tape (hardware store or spare parts box on board).
6: 5x cable ties of different lengths (hardware store or spare parts box on board).
Parts 3 and 4 may be difficult to obtain individually.
Simply load the order list, tick the parts you want and send me the file. (Info: The file can be edited directly in Acrobat Reader.)
Or write me an email
Parts 3 and 4 can be obtained from me (18€ (25€ for two) incl. shipping in Germany, abroad on request). Just write an email. You can get everything else at the hardware store.
Another tip. The Saildrive manual describes the oil change
in the water in chapter 6.2.1. described. The hose nozzle can also be screwed into the oil outlet.
SD50 non-pressurized service kit with 2 hose nozzles 25 € incl. shipping in Germany, abroad on request.
The modification:
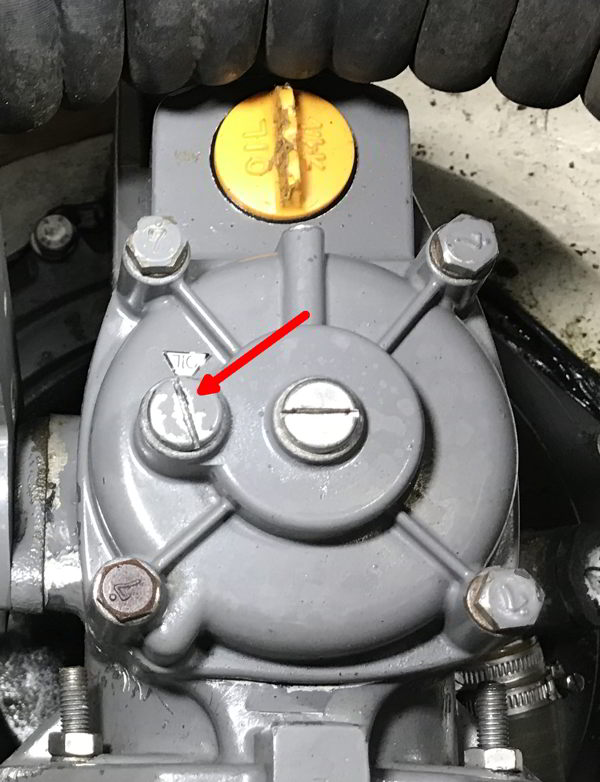
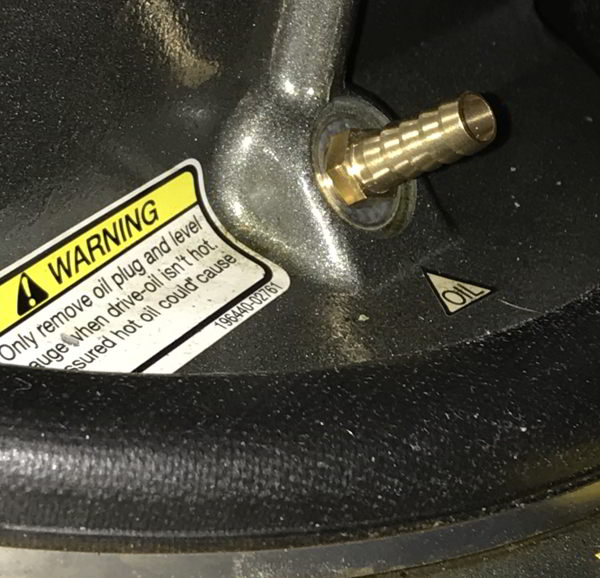
Left: The marked screw is removed from the upper clutch cover.
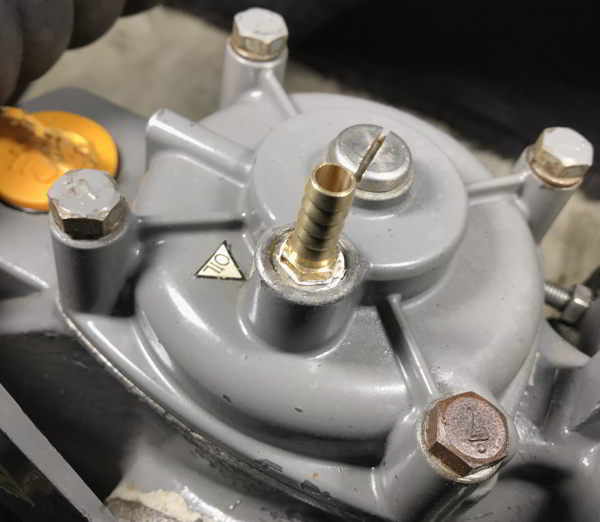
Right: The 10mm hose nozzle is screwed in and sealed with some Teflon tape
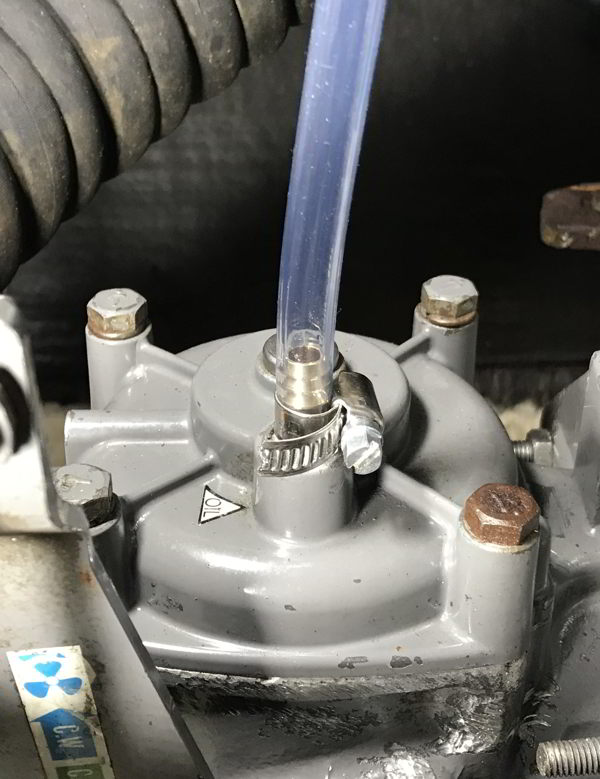
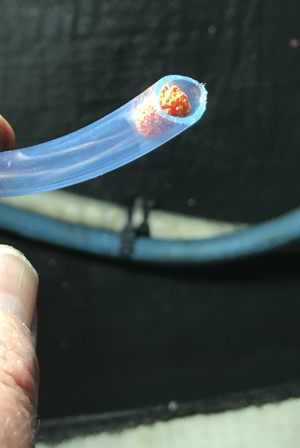
Left: The 10mm hose is put on the hose nozzle and fastened with the hose clamp. Clear soft PVC hose is mostly oil proof and you can see if oil is leaking out. A few cm of oil in the line is not a problem.
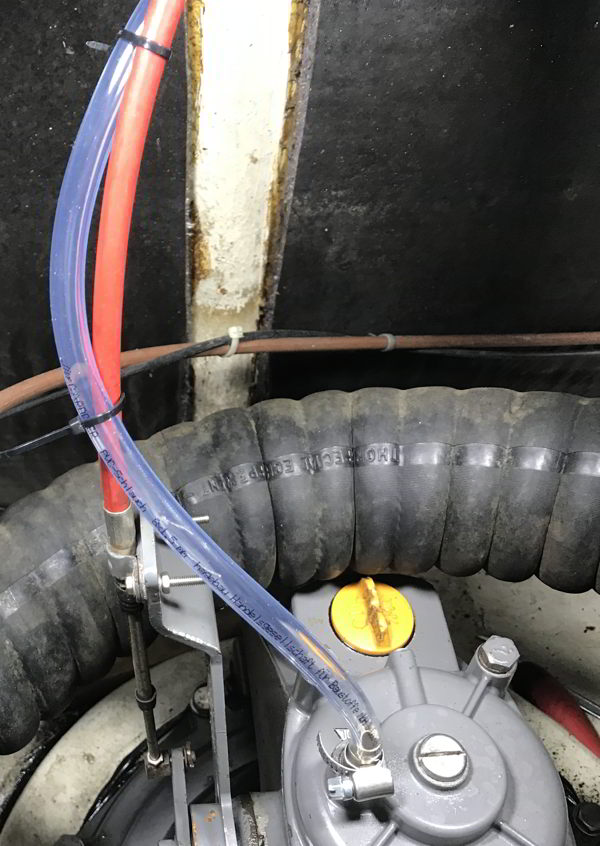
Center: The hose with the cable ties routed up in a wide arc on other parts in the engine compartment.
Right: At the end of the hose, a small foam rubber ball is inserted into the hose to keep dust and insects out.
When heated, the pressure can now escape. The hose can even compensate for small amounts of oil. 1m hose with 10mm inner diameter takes 70ml oil.
Gear oil change on the Saildrive underway.
In the Saildrive operating manual from 2009, the oil change is described from page 42, in the Saildrive operating manual from 2004 in chapter 6.2.1. described. The brass adapter can also be screwed into the oil outlet.
Left: The hose nozzle M10 x 1.5 from the pressureless service kit can also be screwed into the lower part of the sail drive (bottom plate).
Right: The hose nozzle is screwed into the oil outlet and the oil can be pumped out with a hand or electric pump. (Drawing: Yanmar Operations Manual).
Unfortunately, I cannot judge to what extent the oil (or oil thickened with seawater due to leakage) can be removed in this way. There is no information about this.
A very good method of removing the pasty mass from the Saildrive would be to flush it with hot oil. But how do I rinse a sail drive with a boat floating in the water?
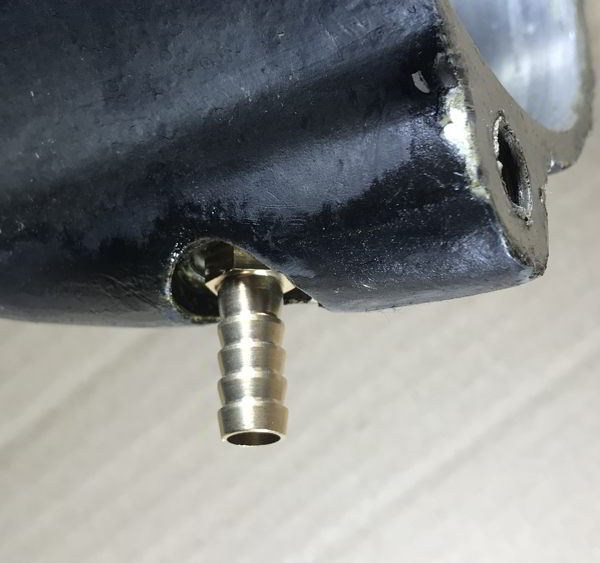
Fortunately, the hose nozzle also fits on the lower oil drain plug from the sail drive.
Step 1: If the gear oil has already reached the consistency of mayonnaise, it should first be warmed up.
Step 2: The Saildrive is filled with gear oil using the dipstick. Any transmission ventilation that may be present, including the ventilation in the cover, will be removed.
Step 3: The oil drain plug is opened under water and (with seal!) removed. No more water can get in because oil is lighter than water and there is no room for additional water in the gearbox that is filled to the brim with oil.
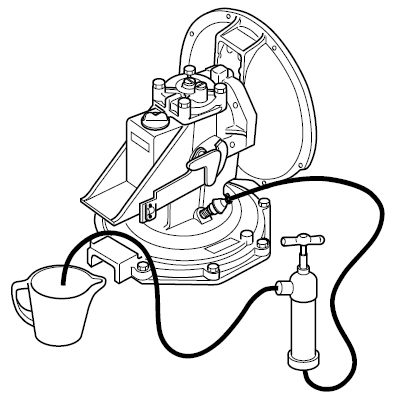
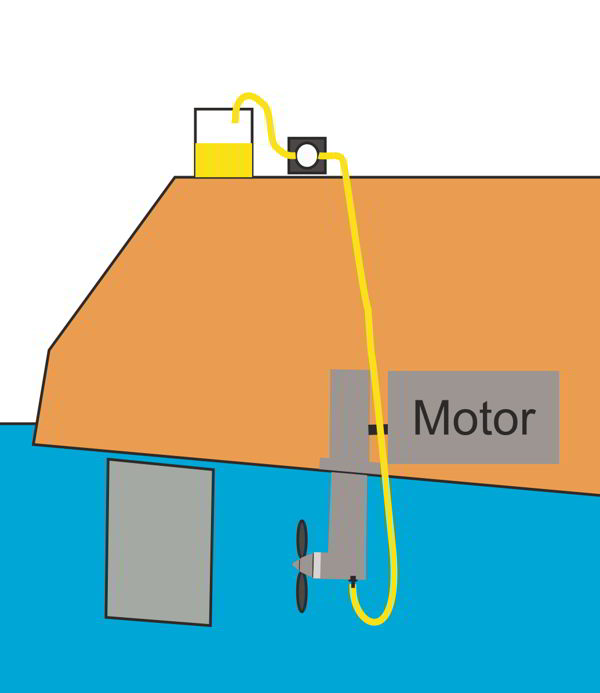
Step 4: The hose nozzle, to which a sufficiently long 10mm hose is now attached, is screwed in carefully (so that the thread is not damaged) instead of the oil drain plug. The other end of the hose is in the cockpit, connected to a transmission oil pump. (right picture)
Step 5: The oil filler opening on the dipstick is opened and the oil is sucked out via the hose/the connected pump. Oil is refilled in the gearbox until only clean oil can be extracted.
Step 5a: You could also flush with hot, thin engine oil, i.e. when the oil arrives warm in the pump, fill the hose on the oil dipstick into the Saildrive and flush the gearbox for a while. In addition, the gearbox could be moved with idle speed in reverse (so that the hose does not get caught in the propeller) to loosen oil mayonnaise that is still stuck. The flushing oil is then replaced with the final transmission oil filling.
Step 6: The gearbox is again filled to the brim - as above - with oil.
Step 7: The brass adapter is replaced with the oil drain plug and seal and tightened. Water cannot penetrate as the Saildrive is filled to the brim with oil. Oil spillage is minimal, if any, since oil is lighter than water.
Step 8: The oil level in the transmission is set to "Max" again using the oil dipstick. Reconnected the saildrive vent.
Conclusion: The actual problem, namely the probably defective seals on the propeller shaft, has not yet been solved. But maybe there is still a shipyard, a crane or a sandbank with enough tide (for a catamaran). The boat owner has now had enough time to think.
Another note:
If you have diving equipment or an electric compressor on board, it is much easier to replace the hose nozzle and oil drain plug underwater.
A word about gear oil
The SD50 operating instructions refer to Mercury Quicksilver High Performance Gear Oil. As far as is known, this oil is not only attributed an exorbitant price, but also very good water-binding properties. I can confirm both.
If you always change the Simmerrings on the propeller of the Saildrive together with the underwater paint, so every 2-3 years, you can do without these properties and use SAE 90 GL3 or GL4 gear oil instead. This costs only 10% - 15% of the Quicksilver oil price and is perfectly adequate for the loads in the sail drive.
Never use GL4+ or GL5 or even higher alloyed oils. Not only are these more expensive, but they are definitely not good for the cone clutch.
And now for the technicians among the sailors:
An API GL4 lubricant contains additives specifically for manual transmissions. Manual transmissions contain non-ferrous metal (synchronizer rings). The friction of a GL4 oil must not be too low, otherwise the synchronizer ring will slip and shifting will become impossible. If the friction is too high, the shifting becomes notchy and scratches. The cone in the SD50 clutch is made of non-ferrous metal. Too little friction would cause the clutch to slip easily.
Also do not use GL4+ or GL4/5. This is thin like GL5 and doesn't contain as harsh additives.
An API GL5 lubricant contains special additives for highly stressed gears, such as E.g. hypoid gear. These gears have curved teeth. In addition to some advantages, this type of gearing has the disadvantage that the surfaces not only roll off each other, but also slide a little. This places increased demands on the material and requires the oil to have high lubricity. The additives contain sulphur, which in turn attacks non-ferrous metals.
In gear or in neutral when sailing?
The wildest reasons why the gear should be engaged or the gearbox should run in neutral are circulating on the internet. In certain cases I agree to the Yanmar instruction. In the case of a fixed-pitch propeller, the gear must run in neutral. With a folding propeller, it is necessary to check whether a folded propeller transmits vibrations to the gear coupling.
Reason: If the gear is engaged while sailing, the water flows around the ship's propeller in a turbulent manner and generates vibrations. The vibrations are transmitted to the clutch cone, which sits in the clutch bell. These vibrations create small movements that polish the clutch bell and cause the clutch to lose engagement. The result is a slipping clutch.
Fake argument: "Not properly lubricated". It is claimed on the internet that the sail drive would not be properly lubricated if it were to run in the neutral position while sailing. In the user manual of the Saildrive SD50 in chapter 2 "Technical specification" under lubrication system "Oil bath type" is mentioned. With this type, all moving parts are always surrounded by oil. A pump is not necessary. So this argument is wrong.
Fake argument: "High wear". What is meant to wear out when the water flow drives the propeller and gear up to the clutch? The force is far too low to cause wear.
Comments, inquiries and hints via mail are always welcome.
Disclaimer:
These instructions were carried out and written to the best of my knowledge and belief based on a repair/maintenance I carried out myself.
The instructions were carefully created and checked by me. No liability is assumed for the use of these instructions or for damage caused by these instructions.
Copyright:
Jochen Brickwede in April 2023